ExpressVPN on Xbox: Does ExpressVPN Work on Xbox?
Enjoy unrestricted access to online games, shows, movies, and stores with ExpressVPN - these quick steps will help you enhance your gaming experience.
- Updated: April 23, 2024
- 0 User Reviews
- Gerald Hunt
Yes, ExpressVPN on Xbox is the best choice ever be it any model Xbox Series S, Xbox Series X, Xbox One, and Xbox 360. You can currently use ExpressVPN with not only Xbox but with Play Station and Nintendo Switch as well. Additionally, you can set up ExpressVPN on a supported router to enable VPN protection for every device in your home.
With the gaming and entertainment industry more connected than ever, a top-tier VPN provider such as ExpressVPN has proved itself to be a valuable asset for any Xbox owner.
For most of them, the main advantage of ExpressVPN is to bypass geographical restrictions on either online games, streaming content, or any website. With ExpressVPN, you can easily unblock geo-blocked services, including on-demand streaming services, apps, games, and more.
Also, Check out our recommended best VPN in 2023.
Stream these geo-restricted content with ExpressVPN:
While a VPN can slow down your connectivity due to encryption, it can also increase your speeds under the right conditions. ExpressVPN can help you achieve lower multiplayer gaming latency with its high-speed servers.
Just check out how fast it is in our ExpressVPN speed test guide. Overcoming bandwidth throttling, smooth browsing, and streaming experience on Xbox consoles are the popular reasons behind using ExpressVPN on Xbox.
Check out our ExpressVPN review USA to learn more.
Setting up ExpressVPN on Xbox
Much like other best VPNs for Xbox, ExpressVPN currently doesn’t offer an official application for gaming consoles. You will have to use alternative methods for setting up ExpressVPN on your Xbox device. While these methods can sometimes be annoying, irritating, and lengthy, you will get complete anonymity and access to the global internet on your Xbox if done right.
There are four main methods for setting up ExpressVPN on Xbox or its competitor known as Play Station.
- ExpressVPN set up via Mac
- ExpressVPN set up via PC
- ExpressVPN set up via Router
- ExpressVPN set up via MediaStreamer
ExpressVPN set up on Xbox via Mac
The following set of instructions will show you to share your ExpressVPN connection from a Mac computer to Xbox using L2TP/IPsec manual configuration.
To share your Mac’s ExpressVPN connection over Wi-Fi, your Mac must be connected to the internet with an ethernet cable.
Make sure that the ExpressVPN application is not connected as we will not be using it at all.
First, you need to establish a manual L2TP/IPsec connection on your Mac. You can follow the steps below to set up a VPN manual connection quickly.
- Click on the Apple menu and select “System Preferences“
- Click the “Network icon” and then press the “+” icon in the lower-left corner to build a new network interface
- For the Interface drop-down list, select VPN, then select L2TP over IPSec from the VPN Type drop-down list
- In the Service Name text box, type a name for your VPN connection, such as “L2TP Xbox,” and then click “Create“
- In the Server Address field, enter ExpressVPN’s server address, and similarly, in the Account Name field, enter your ExpressVPN’s account username
- Click “Authentication Settings,” then enter your ExpressVPN’s account password in the password field and enter “12345678” in the “Shared Secret” field and click “OK“
- Click “Advanced” and make sure to check the box for “Send all traffic over VPN connection,” then click “OK“
- Click “Apply” to save all of your settings.
To initiate the VPN connection, press “Connect,” and your VPN connection will be connected from the network windows.
This wraps up the “building of a VPN connection” part of the configuration. Now, you can share this newly build VPN connection to your Xbox device.
To share the internet connection to your Xbox via Mac, you will need to perform the below steps.
- Launch “System Preference” and click on “Sharing“
- Select “Internet Sharing” from the left panel, and it will open Internet Sharing options at the right side of the screen. Set the following settings in those options
- In the selection box for “Share your connection from,” select the option “L2TP Xbox”
- In the field where it asks “To computers using,” Check the box for Wi-Fi
- Click “Wi-Fi Options” to enter the following details
- Network Name: Set up any name. We are continuing with “Xbox Mac VPN“
- Channel: Leave as default.
- Security: Select WPA2 Personal.
- Password: Create a password. This will be your connection password, so do not forget it. Better to note it down somewhere.
- Press “OK“
Now that the connection sharing is complete, all you have to do is search for “L2TP Xbox” in your Xbox device Wi-Fi and connect to this network. For completing the connection, you will need to enter the password you have set just above.
This marks the completion of setting up ExpressVPN on your Xbox via Mac. Every time you wish to secure your Xbox with ExpressVPN, you have to connect the manual L2TP/IPsec connection first.
ExpressVPN set up on Xbox via PC
Unlike Mac, there isn’t any mandatory requirement for manual connection in PC for network sharing to Xbox. You can connect the official ExpressVPN application on PC and then use the “Mobile Hotspot” feature to share the internet wirelessly on Xbox.
To start network sharing from your PC to your Xbox, follow the steps below.
- Launch “Settings” and click on “Network and Internet“
- Click on “Mobile Hotspot” from the panel on the left side
- In “Share my Internet connection from,” select “Wi-Fi“
- Click on “Edit” to set up a name and password for your network. We are continuing with the name “Xbox PC VPN“
- Click “Change adapter options” under “Related settings“
- In the Network Connections window, right-click “ExpressVPN Tap Adapter” and select “Properties“
- From the Sharing tab, check the box for “Allow other network users to connect through this computer’s Internet connection,” and from the dropdown menu, select the name of the connection you just created. In this case, the name of the connection is “Xbox PC VPN“
- Press “OK“
By this point, you have successfully created a virtual router that will share the internet connection only from the ExpressVPN adapter.
Launch the ExpressVPN application and connect it. Then enable the “Mobile Hotspot” and search for the network on your Xbox. Use the username and password you set up earlier for this Hotspot to connect to this VPN network on your Xbox.
Set up ExpressVPN on Xbox via Router
By setting up ExpressVPN on Xbox through your router, you can spread all the privacy and security of a VPN to every device in your home, including your macOS, Windows, Android, iOS, and complicated devices such as Xbox, Play Station, Firestick, Smart TV. Without even opening its app, you’ll be able to freely download ExpressVPN torrenting combo.
Set up ExpressVPN on the following streaming devices:
We will be covering the process of setting up ExpressVPN with OpenVPN on your DD-WRT Router, which is the most basic and popular router among internet users.
To establish the OpenVPN connection on your router, you first need to download the OpenVPN configuration files from your ExpressVPN account settings page. Once you have the configuration files with you, follow the steps to set up ExpressVPN on your Router.
1. Log into your Router admin page by entering “192.168.0.1” on the browser. You will have to enter the username and password; by default, it is “admin” for both.
2. Click the “Services tab,” then click the “VPN”
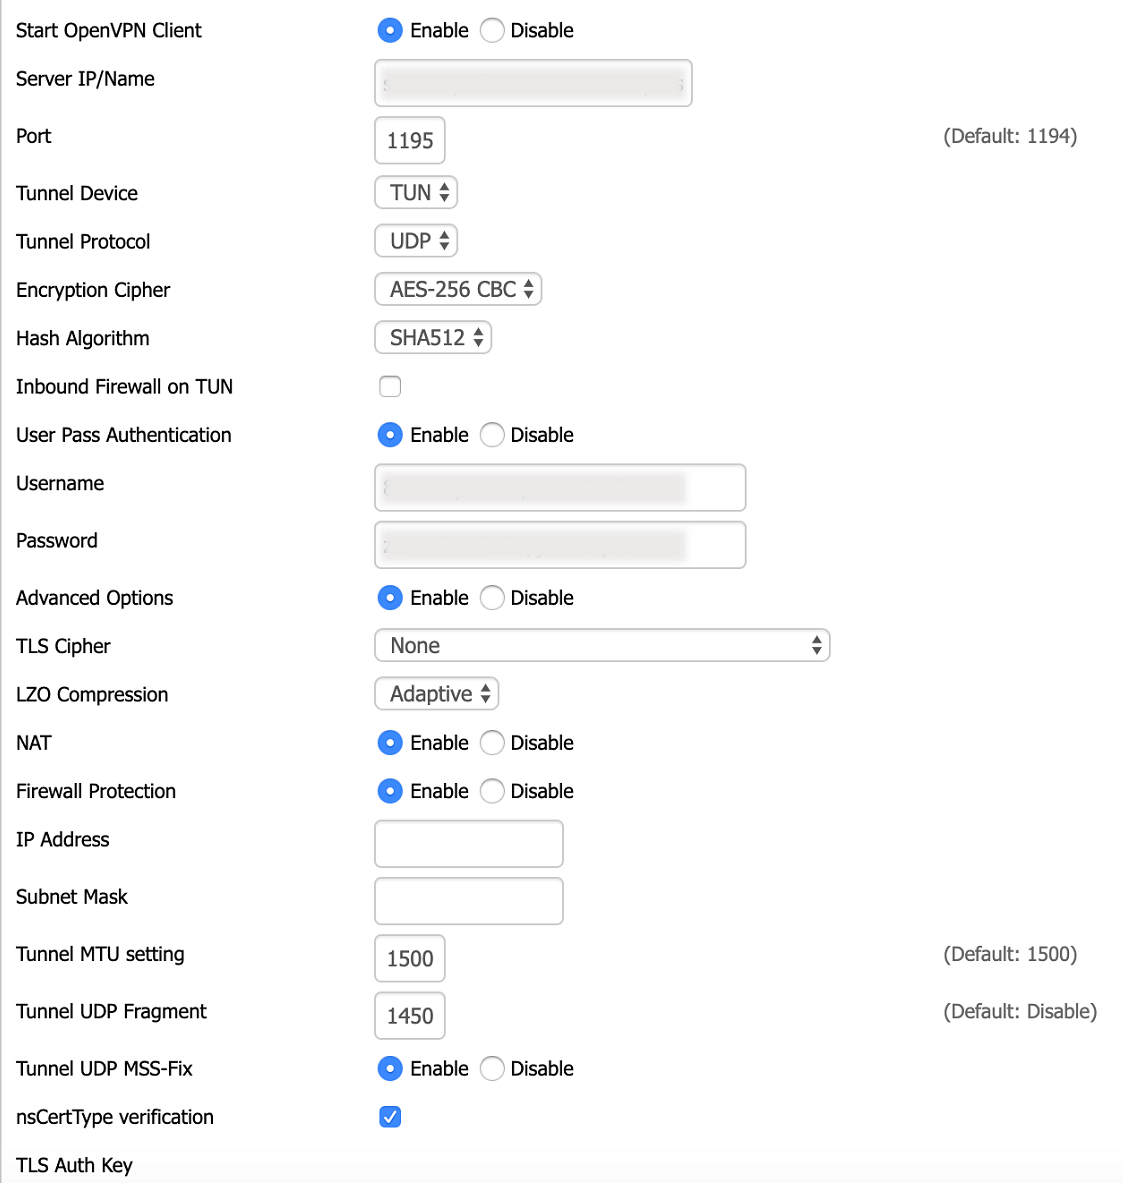
3. To locate the OpenVPN configuration panel, enable the “Start OpenVPN client” option under the OpenVPN Client.
Enter the following information:
5. Server IP/Name: You can locate the server address in the .ovpn configuration file. Open it on notepad or text editor and use the address written between “remote” and the “4-digit port number”
6. Port: Enter the number after the server IP/name in the .ovpn file
7. Tunnel Device: Choose TUN
8. Tunnel Protocol: Choose UDP
9. Encryption Cipher: Choose AES-256 CBC
10. Hash Algorithm: Choose SHA512
11. User Pass Authentication: Choose Enable
12. Username: Enter your ExpressVPN account username
13. Password: Enter your ExpressVPN account password
14. Advanced Options: Choose Enable
15. TLS Cipher: Choose None
16. L2O Compression: Choose Adaptive
17. NAT: Choose Enable
18. Tunnel UDP Fragment: Type 1450
19. Tunnel UDP MSS-Fix: Choose Enable
20. nsCertType verification: Choose the box
In the Additional Config field, enter the following:
persist-key
persist-tun
fragment 1300
mssfix 1450
keysize 256
21. Copy the text between <tls-auth> and </tls-auth> tags in the .ovpn file and paste it in the TLS Auth Key field
#
# 2048 bit OpenVPN static key
#
—–BEGIN OpenVPN Static key V1—–
e30af995f56d07426d9ba1f824730521
d4283db4b4d0cdda9c6e8759a3799dcb
7939b6a5989160c9660de0f6125cbb1f
585b41c074b2fe88ecfcf17eab9a33be
1352379cdf74952b588fb161a93e13df
9135b2b29038231e02d657a6225705e6
868ccb0c384ed11614690a1894bfbeb2
74cebf1fe9c2329bdd5c8a40fe882062
4d2ea7540cd79ab76892db51fc371a3a
c5fc9573afecb3fffe3281e61d72e915
79d9b03d8cbf7909b3aebf4d90850321
ee6b7d0a7846d15c27d8290e031e951e
19438a4654663cad975e138f5bc5af89
c737ad822f27e19057731f41e1e254cc
9c95b7175c622422cde9f1f2cfd3510a
dd94498b4d7133d3729dd214a16b27fb
—–END OpenVPN Static key V1—–
22. Copy the text in between <ca> and </ca> tags in the .ovpn file and paste it in the CA Cert field
—–BEGIN CERTIFICATE—–
MIIE6DCCA9CgAwIBAgIJAMjXFoeo5uSlMA0GCSqGSIb3DQEBCwUAMIGoMQswCQYD
VQQGEwJISzEQMA4GA1UECBMHQ2VudHJhbDELMAkGA1UEBxMCSEsxGDAWBgNVBAoT
D1NlY3VyZS1TZXJ2ZXJDQTELMAkGA1UECxMCSVQxGDAWBgNVBAMTD1NlY3VyZS1T
ZXJ2ZXJDQTEYMBYGA1UEKRMPU2VjdXJlLVNlcnZlckNBMR8wHQYJKoZIhvcNAQkB
FhBtYWlsQGhvc3QuZG9tYWluMB4XDTE2MDExNTE1MzQwOVoXDTI2MDExMjE1MzQw
OVowgagxCzAJBgNVBAYTAkhLMRAwDgYDVQQIEwdDZW50cmFsMQswCQYDVQQHEwJI
SzEYMBYGA1UEChMPU2VjdXJlLVNlcnZlckNBMQswCQYDVQQLEwJJVDEYMBYGA1UE
AxMPU2VjdXJlLVNlcnZlckNBMRgwFgYDVQQpEw9TZWN1cmUtU2VydmVyQ0ExHzAd
BgkqhkiG9w0BCQEWEG1haWxAaG9zdC5kb21haW4wggEiMA0GCSqGSIb3DQEBAQUA
A4IBDwAwggEKAoIBAQDluufhyLlyvXzPUL16kAWAdivl1roQv3QHbuRshyKacf/1
Er1JqEbtW3Mx9Fvr/u27qU2W8lQI6DaJhU2BfijPe/KHkib55mvHzIVvoexxya26
nk79F2c+d9PnuuMdThWQO3El5a/i2AASnM7T7piIBT2WRZW2i8RbfJaTT7G7LP7O
pMKIV1qyBg/cWoO7cIWQW4jmzqrNryIkF0AzStLN1DxvnQZwgXBGv0CwuAkfQuNS
Lu0PQgPp0PhdukNZFllv5D29IhPr0Z+kwPtrAgPQo+lHlOBHBMUpDT4XChTPeAvM
aUSBsqmonAE8UUHEabWrqYN/kWNHCNkYXMkiVmK1AgMBAAGjggERMIIBDTAdBgNV
HQ4EFgQU456ijsFrYnzHBShLAPpOUqQ+Z2cwgd0GA1UdIwSB1TCB0oAU456ijsFr
YnzHBShLAPpOUqQ+Z2ehga6kgaswgagxCzAJBgNVBAYTAkhLMRAwDgYDVQQIEwdD
ZW50cmFsMQswCQYDVQQHEwJISzEYMBYGA1UEChMPU2VjdXJlLVNlcnZlckNBMQsw
CQYDVQQLEwJJVDEYMBYGA1UEAxMPU2VjdXJlLVNlcnZlckNBMRgwFgYDVQQpEw9T
ZWN1cmUtU2VydmVyQ0ExHzAdBgkqhkiG9w0BCQEWEG1haWxAaG9zdC5kb21haW6C
CQDI1xaHqObkpTAMBgNVHRMEBTADAQH/MA0GCSqGSIb3DQEBCwUAA4IBAQCvga2H
MwOtUxWH/inL2qk24KX2pxLg939JNhqoyNrUpbDHag5xPQYXUmUpKrNJZ0z+o/Zn
NUPHydTSXE7Z7E45J0GDN5E7g4pakndKnDLSjp03NgGsCGW+cXnz6UBPM5FStFvG
dDeModeSUyoS9fjk+mYROvmiy5EiVDP91sKGcPLR7Ym0M7zl2aaqV7bb98HmMoBO
xpeZQinof67nKrCsgz/xjktWFgcmPl4/PQSsmqQD0fTtWxGuRX+FzwvF2OCMCAJg
p1RqJNlk2g50/kBIoJVPPCfjDFeDU5zGaWGSQ9+z1L6/z7VXdjUiHL0ouOcHwbiS
4ZjTr9nMn6WdAHU2
—–END CERTIFICATE—–
23. Copy the text between <cert> and </cert> tags in the .ovpn file and paste it in the Public Client Cert field
—–BEGIN CERTIFICATE—–
MIIEnzCCA4egAwIBAgIBAzANBgkqhkiG9w0BAQsFADCBqDELMAkGA1UEBhMCSEsx
EDAOBgNVBAgTB0NlbnRyYWwxCzAJBgNVBAcTAkhLMRgwFgYDVQQKEw9TZWN1cmUt
U2VydmVyQ0ExCzAJBgNVBAsTAklUMRgwFgYDVQQDEw9TZWN1cmUtU2VydmVyQ0Ex
GDAWBgNVBCkTD1NlY3VyZS1TZXJ2ZXJDQTEfMB0GCSqGSIb3DQEJARYQbWFpbEBo
b3N0LmRvbWFpbjAeFw0xNjAxMTUxNjE1MzhaFw0yNjAxMTIxNjE1MzhaMIGdMQsw
CQYDVQQGEwJISzEQMA4GA1UECBMHQ2VudHJhbDELMAkGA1UEBxMCSEsxFjAUBgNV
BAoTDVNlY3VyZS1DbGllbnQxCzAJBgNVBAsTAklUMRYwFAYDVQQDEw1TZWN1cmUt
Q2xpZW50MREwDwYDVQQpEwhjaGFuZ2VtZTEfMB0GCSqGSIb3DQEJARYQbWFpbEBo
b3N0LmRvbWFpbjCBnzANBgkqhkiG9w0BAQEFAAOBjQAwgYkCgYEAxsnyn4v6xxDP
nuDaYS0b9M1N8nxgg7OBPBlK+FWRxdTQ8yxt5U5CZGm7riVp7fya2J2iPZIgmHQE
v/KbxztsHAVlYSfYYlalrnhEL3bDP2tY+N43AwB1k5BrPq2s1pPLT2XG951drDKG
4PUuFHUP1sHzW5oQlfVCmxgIMAP8OYkCAwEAAaOCAV8wggFbMAkGA1UdEwQCMAAw
LQYJYIZIAYb4QgENBCAWHkVhc3ktUlNBIEdlbmVyYXRlZCBDZXJ0aWZpY2F0ZTAd
BgNVHQ4EFgQU9MwUnUDbQKKZKjoeieD2OD5NlAEwgd0GA1UdIwSB1TCB0oAU456i
jsFrYnzHBShLAPpOUqQ+Z2ehga6kgaswgagxCzAJBgNVBAYTAkhLMRAwDgYDVQQI
EwdDZW50cmFsMQswCQYDVQQHEwJISzEYMBYGA1UEChMPU2VjdXJlLVNlcnZlckNB
MQswCQYDVQQLEwJJVDEYMBYGA1UEAxMPU2VjdXJlLVNlcnZlckNBMRgwFgYDVQQp
Ew9TZWN1cmUtU2VydmVyQ0ExHzAdBgkqhkiG9w0BCQEWEG1haWxAaG9zdC5kb21h
aW6CCQDI1xaHqObkpTATBgNVHSUEDDAKBggrBgEFBQcDAjALBgNVHQ8EBAMCB4Aw
DQYJKoZIhvcNAQELBQADggEBAFyFo2VUX/UFixsdPdK9/Yt6mkCWc+XS1xbapGXX
b9U1d+h1iBCIV9odUHgNCXWpz1hR5Uu/OCzaZ0asLE4IFMZlQmJs8sMT0c1tfPPG
W45vxbL0lhqnQ8PNcBH7huNK7VFjUh4szXRKmaQPaM4S91R3L4CaNfVeHfAg7mN2
m9Zn5Gto1Q1/CFMGKu2hxwGEw5p+X1czBWEvg/O09ckx/ggkkI1NcZsNiYQ+6Pz8
DdGGX3+05YwLZu94+O6iIMrzxl/il0eK83g3YPbsOrASARvw6w/8sOnJCK5eOacl
21oww875KisnYdWjHB1FiI+VzQ1/gyoDsL5kPTJVuu2CoG8=
—–END CERTIFICATE—–
24. Copy the text between the <key> and </key> tags in the .ovpn file and paste it into the Private Client Key field
—–BEGIN PRIVATE KEY—–
MIICdgIBADANBgkqhkiG9w0BAQEFAASCAmAwggJcAgEAAoGBAMbJ8p+L+scQz57g
2mEtG/TNTfJ8YIOzgTwZSvhVkcXU0PMsbeVOQmRpu64lae38mtidoj2SIJh0BL/y
m8c7bBwFZWEn2GJWpa54RC92wz9rWPjeNwMAdZOQaz6trNaTy09lxvedXawyhuD1
LhR1D9bB81uaEJX1QpsYCDAD/DmJAgMBAAECgYEAvTHbDupE5U0krUvHzBEIuHbl
ptGlcfNYHoDcD3oxYR3pOGeiuElBexv+mgHVzcFLBrsQfJUlHLPfCWi3xmjRvDQc
r7N7U1u7NIzazy/PpRBaKolMRiM1KMYi2DG0i4ZONwFT8bvNHOIrZzCLY54KDrqO
n55OzC70WYjWh4t5evkCQQDkkzZUAeskBC9+JP/zLps8jhwfoLBWGw/zbC9ePDmX
0N8MTZdcUpg6KUTf1wbkLUyVtIRjS2ao6qu1jWG6K0x3AkEA3qPWyaWQWCynhNDq
u2U1cPb2kh5AJip+gqxO3emikAdajsSxeoyEC2AfyBITbeB1tvCUZH17J4i/0+OF
TEQp/wJAb/zEOGJ8PzghwK8GC7JA8mk51DEZVAaMSRovFv9wxDXcoh191AjPdmdz
zCuAv9iF1i8MUc3GbWoUWK39PIYsPwJAWh63sqfx5b8tj/WBDpnJKBDPfhYAoXJS
A1L8GZeY1fQkE+ZKcPCwAmrGcpXeh3t0Krj3WDXyw+32uC5Apr5wwQJAPZwOORea
C4YNfBPZN9BdHvVjOYGGUffpI+X+hWpLRnQFJteAi+eqwyk0Oi0SkJB+a7jcerK2
d7q7xhec5WHlng==
—–END PRIVATE KEY—–
25. Click “Save,” and then click “Apply settings” to start the connection to the VPN
To check whether a VPN connection is established or not, go to Status -> OpenVPN.
If your VPN connection is successful, you will see the words “CONNECTED SUCCESS” and the following:
Once you have successfully connected ExpressVPN on your Router, all remaining is to connect your Xbox with the router. To set up VPN on other popular router brands such as TP-Link, Asus, Linksys, and D-Links, follow the instructions in our ExpressVPN router guide USA. For Asus users, we have a separate ExpressVPN on Asus Router guide with a detailed step-by-step method.
If you encounter any issues, check out our ExpressVPN not working guide.
See Also: ExpressVPN – is it working in Russia?
ExpressVPN’s MediaStreamer set up on Xbox
MediaStreamer is a DNS service designed to enhance your streaming experience. If your device doesn’t natively support VPN, MediaStreamer is a great alternative for streaming.
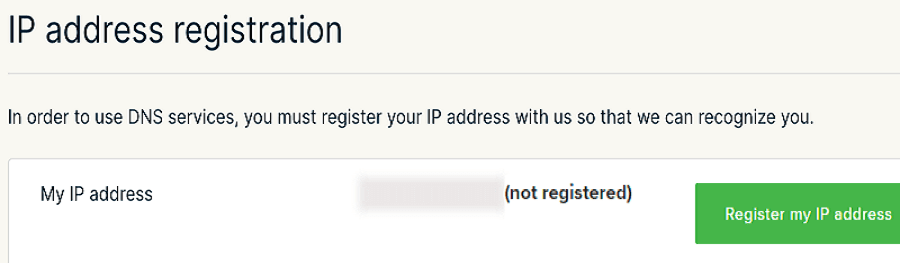
To use this feature, you have to register your Internet Service Provider IP address on the ExpressVPN website. This allows ExpressVPN to recognize your IP address and allow your device access to MediaStreamer.
If you have an ExpressVPN subscription or ExpressVPN free trial, follow the steps below to set up MediaStreamer on your Xbox. First, you’ll have to your IP address on the ExpressVPN website.
1. Visit the ExpressVPN DNS settings page. If prompted, enter your ExpressVPN credentials and click “Sign In”
2. Click “Register my IP address” under IP address registration. If it already reads “registered” next to your IP address, there is no need to choose this option again.
3. Enable “Automatically register my IP address” on. This will allow ExpressVPN to detect changes to your IP address automatically

To receive your MediaStreamer DNS IP address, follow the steps below.
4. Visit the ExpressVPN setup page. If prompted, enter your ExpressVPN credentials and click “Sign In”
5. Look at the right side, and you will find the “MediaStreamer DNS server IP address”
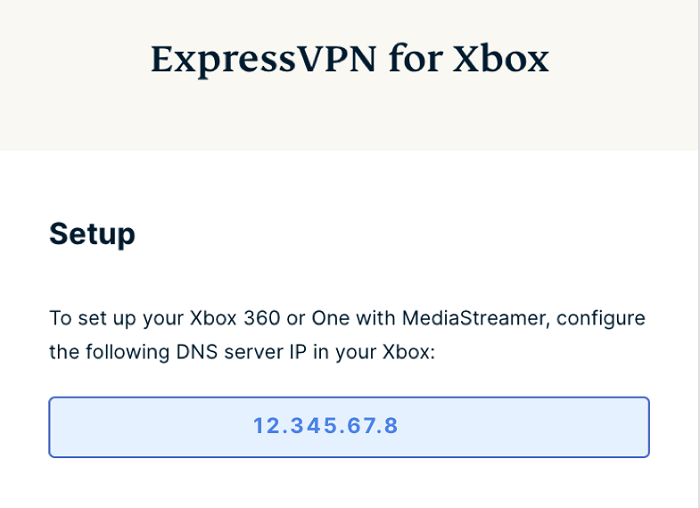
Now, you have to configure this DNS server IP address on Xbox.
6. From the main menu of your Xbox, go to “Settings”
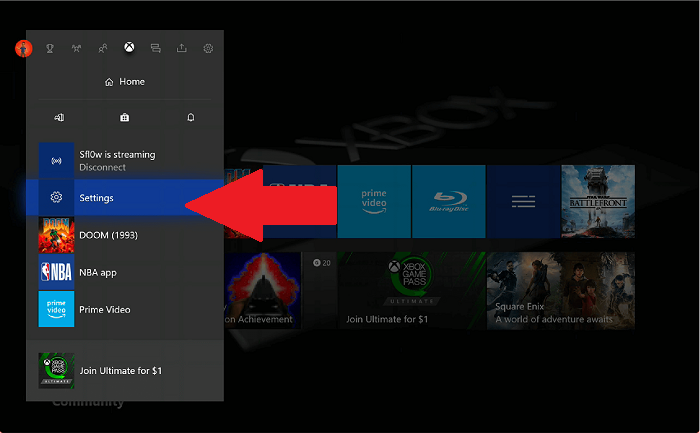
7. Select “Network settings” from the General tab
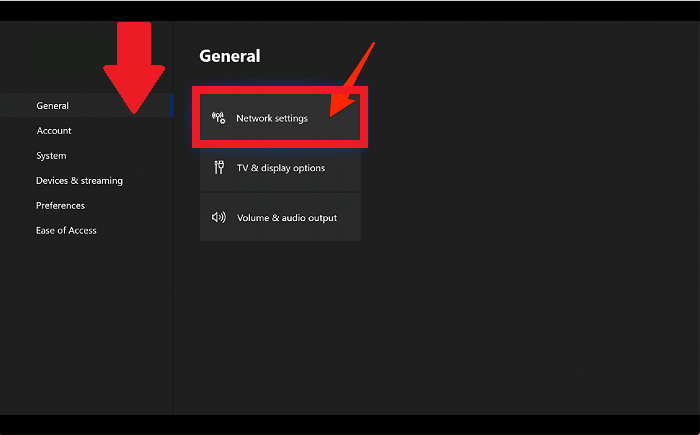
8. In the Network settings, select “Advanced settings”
9. Choose “DNS settings” and select “Manual”
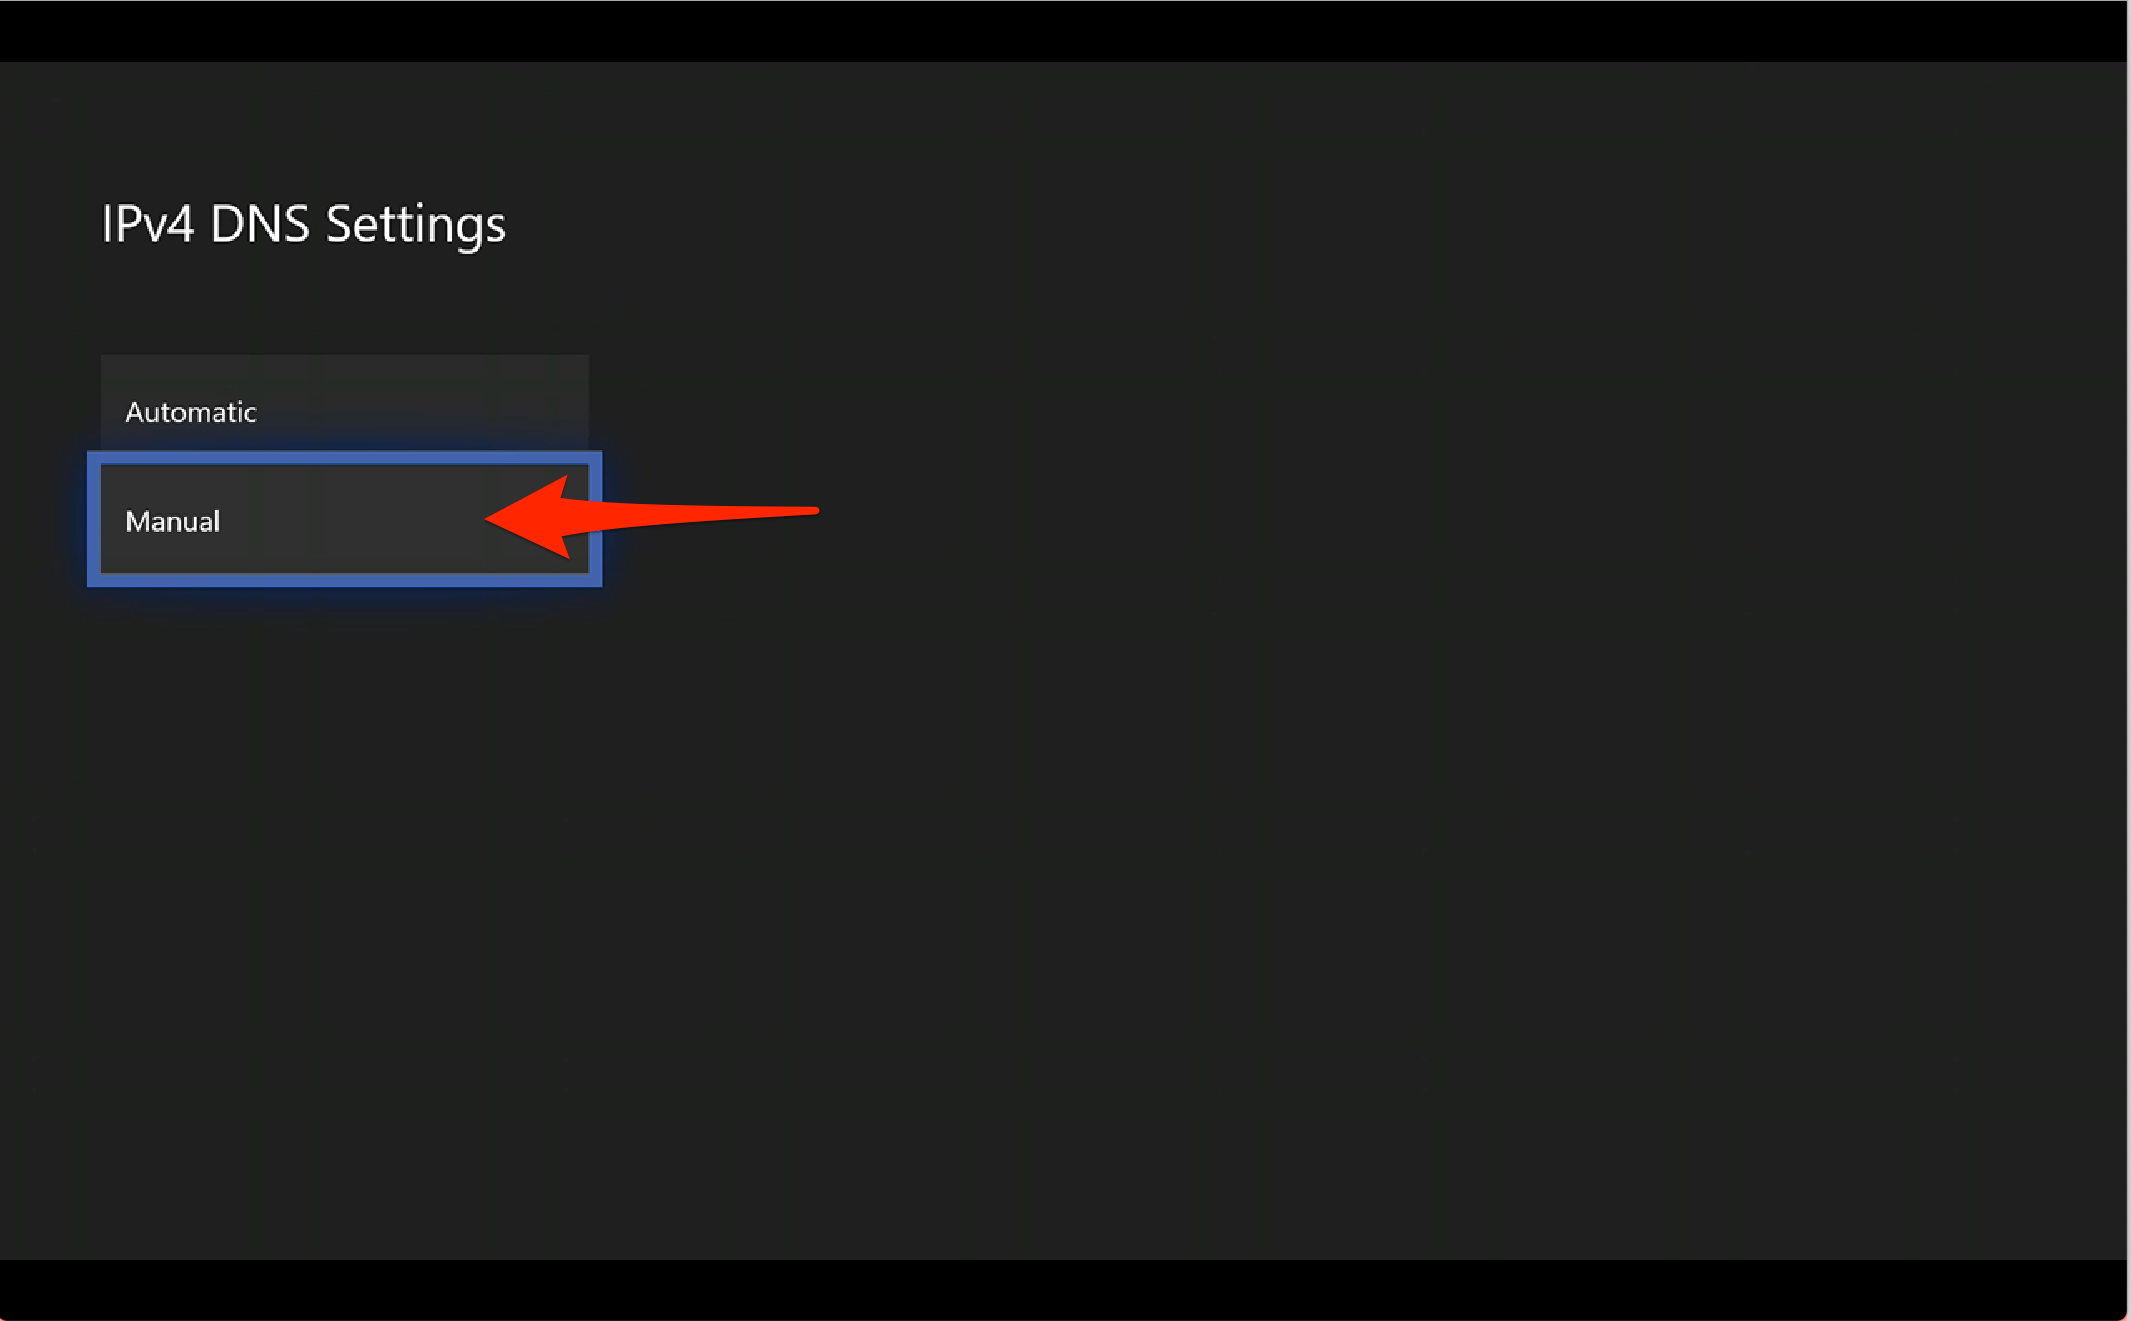
10. In the Primary IPv4 DNS, enter the first MediaStreamer IP address, and for secondary IPv4 DNS, enter the second MediaStreamer IP address

After you have saved the settings, the setup is complete. You now have access to MediaStreamer on your Xbox.
ExpressVPN’s MediaStreamer is a great feature for accessing geo-blocked content on unfriendly devices with direct VPN configuration. You can set up ExpressVPN on your Firestick, Android TV, Smart TV, Kodi, Roku, and other devices in a similar fashion to access unlimited content at high-speed. We have also tried playing Roblox using ExpressVPN, we got the best results while playing. So, we concluded that it turned out to be the best VPN for Roblox.
You can also configure ExpressVPN on Linux distros, including Debian, Ubuntu, Fedora, and more.
Port Forwarding on Xbox
In simple terms, port forwarding can be defined as the process in which you set up your router to redirect certain packages onto certain locations. It can be used for tasks such as accessing a home camera remotely from work or direct linking with your online game server. Once port forwarding rules are defined, the incoming packets will only use the ports that have been assigned.
If you prefer online multiplayer games on your Xbox, then setting up port forwarding should be the first thing to do. The benefits of port forwarding on your Xbox are obvious once you realize just how much they stabilize and streamline your online gaming experience.
Such benefits include fewer latency issues, higher-quality voice chat, and better in-game stability.
Before we start with port forwarding on Xbox, the most important thing to know are the ports to forward. Below is the list of the ports that you will need to forward.
Port 88 (UDP)
Port 500 (UDP)
Port 3544 (UDP)
Port 4500 (UDP)
Port 3075 (UDP + TCP)
Port 53 (UDP + TCP)
Port 80 (TCP)
Ok, so let’s begin the process of setting up port forwarding on Xbox.
- From your Xbox main page, go to “Settings” -> “Network Settings” -> “Advanced settings”
- Make a record of your Xbox’s IP Address, MAC addresses, and Subnet Mask number
- In the Advanced Settings tab, select “IP settings” -> “Manual”
- Now enter in the numbers you noted from before. With this, the IP of your Xbox will never change.
- Log into your router settings page and locate the port forwarding settings, which should have an option to add a rule. Select this “option“
- Add separate rules for Xbox ports. You can use any naming style for the rules. Just remember to save the changes once you are done.
- Restart your Xbox and your router, then navigate your way towards Network Settings again
- The information shown should say Nat Type: Open.
- If it doesn’t, then double-check to make sure the port number and IP address are correct
It’s as easy as that. 10 minutes of effort is all it takes to port forward your Xbox and prepare it for Halo Infinite, GTA V, Call of Duty, and Fortnite.
Region switch on Xbox
If you are thinking about switching the country or region of your Xbox, then you might want to reconsider as the stuff you got in one region might not work in another. The stuff includes Xbox Live Gold, Xbox game pass, apps, games, music purchases, movie and TV purchases, and rentals.
You can only switch your region once every three months. With that said, let’s take a look at the steps for changing your region on Xbox.
- Press the Xbox button to open the guide
- Choose “Settings” -> “All Settings” -> “System” -> “Language & location“
- Choose your “new location” from the list available and then restart your Xbox
Your Gamertag unlocked achievements, and the rest of your Xbox profile info all move with you in your new region on Xbox. Any time remaining on your Xbox Live Gold subscription will be transferred with your account to the new country or region.
ExpressVPN – Why is it best for your Xbox?
ExpressVPN on Xbox is the ideal choice for you be it your Xbox, Xbox One, Xbox 360, and Xbox Series X if you wish to access game pass, apps, games, music purchases, movie and TV purchases that are geo-restricted for your location.
With 3,000+ servers in 94 countries, it can certainly open the doors to the unrestricted gaming experience and digital media content from anywhere around the globe.
Using its servers, you can enjoy not only amazing discounts on your games that are not available in your region but also get early access to geo-restricted games.
Reducing your online ping and lag during gaming and preventing you from any ISP throttling are also some of the major advantages of using ExpressVPN. Best of all, ExpressVPN comes with a kill switch for complete privacy.
ExpressVPN is a bit expensive, however, if you hurry now, you can avail of its limited-time “12 Months + 3 Months Free” offer that comes with a 30-day money-back guarantee. That is the best deal you can get at the moment as ExpressVPN doesn’t technically offer an ExpressVPN lifetime deal.