
Kodi, a free, open-source media player formerly known as XBMC, streamlines your entertainment access and is easy to use for nontech sevy. However, if you need help, I created a Kodi guide for beginners that explains how to set up Kodi on your devices, enabling you to stream your favorite shows, including region-restricted content.
To maximize your streaming options and ensure your streaming is private and secure, consider integrating the best VPN. And for Kodi, I recommend ExpressVPN. This powerful combination breaks geographical restrictions and protects your online activity, expanding access to vast streaming content.
Since Kodi doesn’t host any content, it requires add-ons to stream movies, TV shows, and more. However, be cautious as some add-ons can access restricted or illegal content. This makes using a VPN essential for a secure, enhanced viewing experience. Add-ons are vital for accessing Kodi’s extensive content library, which includes everything from the latest movies to niche TV series.
In this tutorial, I’ll guide you through selecting essential add-ons and provide tips to enhance your Kodi setup. Get ready to dive smoothly into the vast entertainment world of Kodi.
What is Kodi?
Kodi is fundamentally an open-source media player and has been serving users for around two decades. The reason for its success and popularity relies on how it allows you to play video, audio, and other multimedia formats on your devices.
Primarily, Kodi is known for its online streaming capabilities, allowing users to access a wide range of media, including:
- Movies
- TV series
- Documentaries
- Sports events
- Live broadcasts
- Music, and more.
Additionally, Kodi offers extensive customization options for settings, display preferences, and skin configurations through various builds, enhancing the user experience.
While Kodi is a well-regarded, entirely free application, it’s important to note that it does not directly provide content. To enjoy your favorite movies and shows, you must add Kodi add-ons. These can be installed from Kodi’s official repository or third-party sources. Fortunately, an extensive list of Kodi add-ons offers excellent content. Follow the Kodi guide for beginners to enjoy the full potential of Kodi.
How Do I Set Up Kodi Step by Step
Explore the vast capabilities of Kodi by setting it up on your preferred device, from Amazon Firestick to Android Smart TVs. Customize your experience with unique Kodi skins and add-ons to tailor the interface and content to your liking. Enjoy endless entertainment with Kodi’s powerful streaming and media management tools optimized for users.
How to Install Kodi on Amazon FireStick & Fire TV
Remember that while Amazon Store doesn’t host Kodi, you can easily sideload it onto your FireStick or Fire TV using the following method. This Kodi guide for beginners ensures you can enjoy Kodi even on platforms that do not officially support it.
- Enable app installation from unknown sources: Go to the Firestick home screen and click the gear icon.
- Install the Downloader App from the Amazon App Store.
- Download and install Kodi using the Downloader app. Open the app to start.
How to Install Kodi on Android Mobiles & Tablets
Installing Kodi on Android devices is straightforward, thanks to its availability on the Google Play Store. Let’s get Kodi set up on your Android device without any hassle.
-
- Open the Google Play Store on your Android mobile or tablet.
- Search for Kodi in the app store.
- Click ‘Install’ and let the app download and install onto your device.

It’s that simple! Once installed, you can start exploring the extensive features Kodi offers.
How to use Kodi App on Windows PC
Windows users have a couple of different methods depending on their operating system version. I’ll guide you through both, ensuring you can get Kodi up and running regardless of your Windows version.
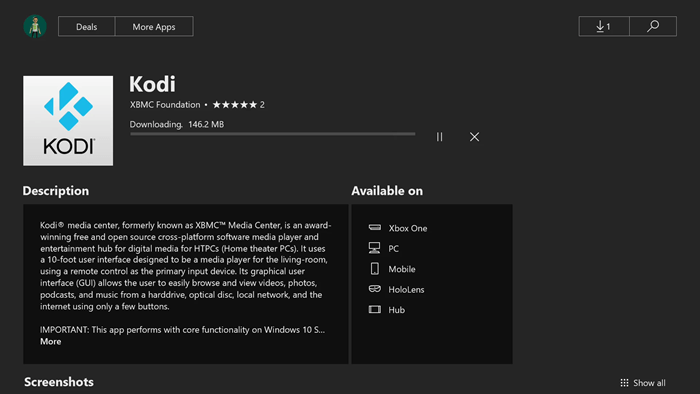
For Windows 10 & 11:
- Launch the Microsoft Store from your computer.
- Use the Search bar to find Kodi.
- Open the Kodi app dashboard and click the ‘Get’ button.
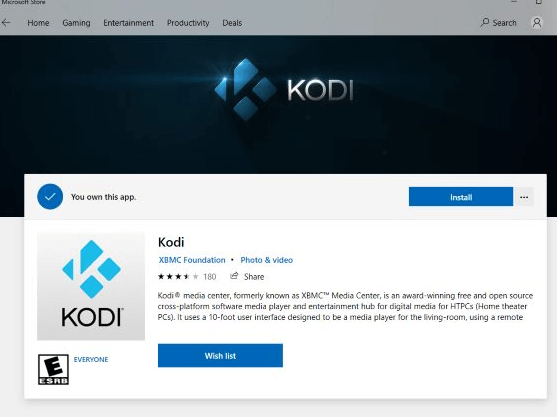
The installation will be completed in just a minute or two.
For Windows 8.1 & Older:
- Visit the official Kodi website.
- Navigate to the ‘Download’ section and select the Windows logo.
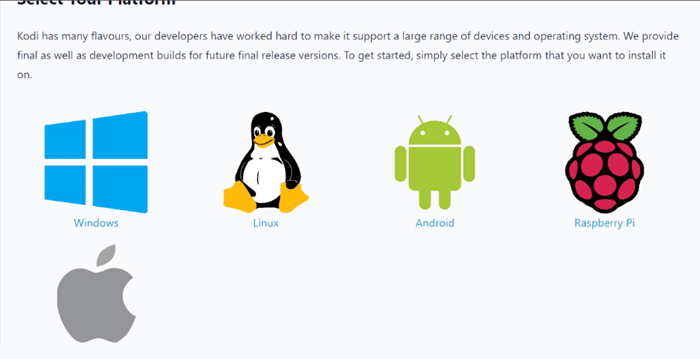
- Choose the appropriate installer (64 BIT or 32 BIT) based on your computer’s specifications.
How does Kodi work on Mac OS
This Kodi for beginners guide helps you to install Kodi on your macOS device.
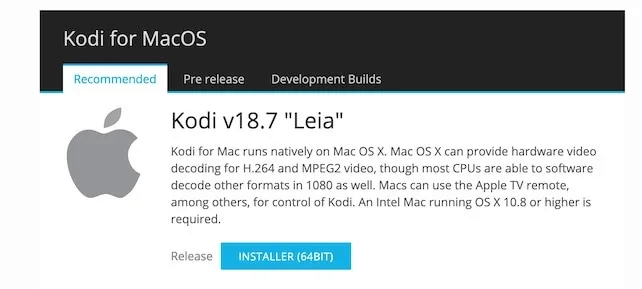
- Open Safari and search for Kodi.
- Scroll down and click on the macOS logo.
- Select ‘Installer (64-BIT)’ from the ‘Recommended’ tab.
Follow the Kodi guide for beginners to get Kodi on your Mac.
How to use the Kodi App on iOS Devices
iOS installation methods vary depending on whether your device is jailbroken or not. Here’s how you can get Kodi on your iOS devices:
Installing Kodi on iPad & iPhone Using TweakBox App
For users who prefer a straightforward approach without jailbreaking, the TweakBox app is an ideal choice. Apple may revoke the TweakBox app certificate; if it fails, consider alternatives like AppValley, TUTUApp, or AltStore.
- Download and Install: First, download the TweakBox app on your iPhone or iPad. This third-party app store allows you to install apps unavailable on the App Store.
- Search and Install Kodi: Open TweakBox, go to Apps Categories Flash Apps and find Kodi. Download and install the Kodi.ipa file.
- Enable Kodi: Post-installation, navigate to Settings General Profiles or Device Management. Select “Enterprise App,” choose Kodi from the list, and trust it.
- Launch Kodi: Once set up, open Kodi from your device’s app list to add add-ons and stream content.
Installing Kodi on iPhone and iPad Using Cydia Impactor
This method in the Kodi guide for beginners requires a computer (Windows, macOS, or Linux) and a USB cable. It’s a bit more complex but minimizes CPU usage on your iOS device.
- Prepare Your Computer: Download and install Cydia Impactor. Ensure your computer recognizes your Apple ID as a Settings General Device Management developer.
- Get the Kodi IPA File: Download the Kodi IPA file from iOS Ninja or another third-party site, as Kodi’s official site does not offer the IPA format.
- Connect and Setup: Link your iOS device to your computer using a USB cable. Close any auto-launching applications like iTunes, which might disrupt the process.
- Install Using Cydia Impactor: Open Cydia Impactor, ensure it recognizes your device, drag the IPA file into the application, and start the installation by entering your Apple ID and password.
- Finalize Installation: After the Kodi icon appears on your device, go to Settings General Profiles Device Management, and make Kodi a trusted app by confirming your Apple ID.
After completing these steps, you’ll find the Kodi app ready on your iOS device’s home screen, allowing you to customize and enjoy a variety of streaming content.
How to open Kodi on Android Smart TV & TV Boxes
To enjoy Kodi on your Android Smart TV or TV Box, the installation process is straightforward. Here’s what you need to do:
- Turn on your TV. If you’re using an Android TV Box, ensure it’s connected to your TV.
- Once the home screen is visible, open the Google Play Store.
- Search for the Kodi app.
- Follow the on-screen instructions to install Kodi. The whole process should take just a few minutes.
After following the Kodi guide for beginners steps for Android Smart TV & TV Boxes, your Kodi is installed, it’s time to personalize it and start streaming your favorite content. Remember, each device offers unique opportunities to enhance your Kodi experience.
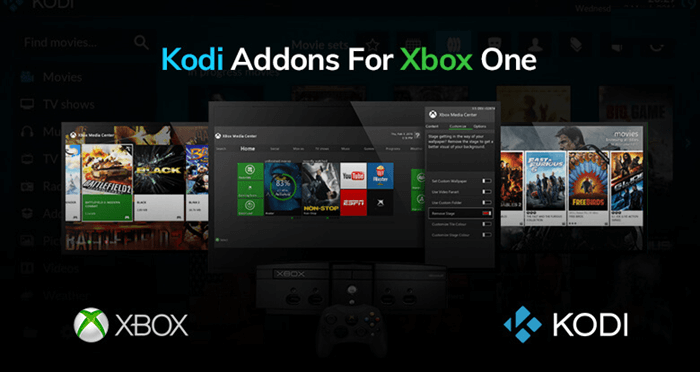
How to use Kodi on Xbox One
Installing Kodi on your Xbox One transforms your gaming console into a powerful media center, allowing you to stream movies, TV shows, and more directly on your console. Follow this guide to quickly and easily set up Kodi on your Xbox One and unlock its full entertainment potential.
- Search for Kodi: Click the Search button on the home screen, type “Kodi” into the search box, and then click on the Kodi icon.
- Install Kodi: Click the “Get” button to start the download.
- Wait for Installation: Allow some time for Kodi to download and install onto your Xbox One.
- Launch Kodi: Once installed, click “Launch.”
- Open Kodi: Kodi will now open on your Xbox One, ready for use.
How to Install Kodi on Chromecast with Google TV
You can easily get Kodi on Chromecast by following the Kodi guide for beginners and unlocking various customizable content options. Follow these Kodi beginners’ steps to set Kodi up quickly and enjoy a richer, more diverse media library on your TV.
- Open Search: From the device’s main menu, click “Search” and type “Kodi” into the search box, then select the search icon.
- Install Kodi: Click “Install” to begin the installation process.
- Return Home: Once Kodi is installed, return to the home screen of your Chromecast with Google TV.
- Find Kodi in Apps: Click on “Apps” from the menu and locate Kodi within your apps list.
- Adjust App Position: Hold down the “OK” button on your remote and select “Move” to place Kodi wherever you prefer in the menu, then click the “OK” button again.
- Initial Setup: When launching Kodi for the first time, click “Continue” and then “Allow”.
- Finalize Installation: Wait a few seconds for Kodi to complete the installation.
- Start Using Kodi: You have successfully installed Kodi on your Chromecast with Google TV. Enjoy accessing your favorite content!
What are Kodi Addons?
Kodi add-ons enhance your streaming experience by providing access to online content like movies, shows, and live TV. Whether you opt for add-ons from the official Kodi repository or third-party sources, the installation process is straightforward and quick.
How to Install Addons on Kodi
Installing addons on Kodi allows you to customize your streaming experience with content tailored to your interests. Follow these steps to add new functionality to your Kodi setup:
- Choose Your Addon: Determine the type of content you want, such as movies or live TV, and select an addon that provides these features.
- Enable Third-Party Addons: Modify Kodi’s settings to allow the installation of third-party addons for a wider range of content.
- Add the Source: Locate the URL for the addon’s source and enter it into Kodi.
- Install the Repository: Use the added source to download and install the repository that contains the addon.
- Download the Addon: Navigate through the repository to find and install your chosen addon.
Choosing a Kodi Add-On
By following the Kodi guide for beginners, you can install Add-ons from unknown sources or third-party add-ons. These add-ons offer a range of content, including movies, TV shows, live streams, and replays. They vary greatly in focus—some target specific genres or eras, while others provide vast libraries of multimedia content.
Installing The Crew Kodi Add-On
“The Crew” is a popular Kodi add-on known for its comprehensive content selection. Here’s a step-by-step guide to installing it:
- Add Source:
- Go to the add source section, and enter the URL:
https://team-crew.github.io, and confirm by clicking OK. This is the official source for “The Crew” Kodi Addon.
- Go to the add source section, and enter the URL:
- Name Your Source:
- Assign a name to the media source for easy identification and click OK.
- Install from Zip File:
- Navigate back to the main menu and select Add-ons.
- Choose “Install from zip file” and find the media source you named.
- Select
repository.thecrew-0.0.1.zipfrom the available options.
- Install from Repository:
- Once the repository is installed, click “Install from repository.”
- Select “The Crew Repository”.
- Navigate to “Video add-ons”, find “The Crew”, and click on it.
- Hit the “Install” button and confirm any subsequent prompts.
- Accessing The Crew Add-On:
- After installation, return to Kodi’s home screen.
- Go to Add-ons, then “Video add-ons,” and select “The Crew” to open it.
- Begin Streaming:
- With “The Crew” now installed, you can stream content directly through Kodi.
Managing Kodi Add-Ons
Choosing add-ons should align with your viewing preferences, and installing a few favorites is advisable to avoid overloading Kodi’s system. This keeps your home screen uncluttered and your Kodi running smoothly. Once installed, the add-ons appear on your Kodi home screen under the Add-ons section, where you can easily access and enjoy your selected content.
This method ensures a clean and efficient way to enhance your Kodi experience by integrating preferred add-ons like “The Crew” for a tailored entertainment setup.
Accessing and Using Your Kodi Addons for Movies and Shows
Once your addons are installed after following the Kodi guide for beginners, accessing and using them is simple. They will appear in the Video Addons section, where you can stream various content types.
- Navigate to Addons: From Kodi’s home screen, click on “Add-ons.”
- Open Video Addons: Select “Video add-ons.” Hovering over this option will also display your installed video streaming add-ons.
- Browse and Use Addons: Click on an addon to open it. For instance, selecting the Crew addon will show you categories like Movies, with further subdivisions such as New Movies, Trending, etc.
- Stream Content: Choose a title, and Kodi will fetch streaming links. Click on a link to start watching your chosen movie or show.
What are Third-Party Kodi Add-Ons?
Third-party developers create third-party Kodi add-ons. It is called third-party add-ons because they are developed by individual developers other than the official Kodi developers.
These third-party add-ons let you stream Movies, TV Shows, Live Sports, Live IPTV, and so much more. These add-ons are found in different repositories, which are also third-party.
Popular Third-Party Kodi Add-ons
I list some of the all-time popular third-party Kodi add-ons that help you watch Movies, TV shows, live IPTV, and live sports without subscription charges. Here is a list:
- Exodus Redux
- Yoda
- The Magic Dragon
- Movie Theater Butter
- Gaia
- Joker Sports Kodi
- Seren
- Venom
Popular Official Kodi Add-ons
If you find official Kodi add-ons more appealing, try one of the add-ons listed below to stream media content. However, you wouldn’t find any latest media content, mostly Live Channels. Here is a list:
- iPlayer
- Crackle
- Fox Sports GO
- ESPN 3
How to Remove Kodi Add-on
It so happens in the Kodi world that now and then, you will find Kodi add-ons not working. You can remove add-ons that no longer work or you do not need them by following the Kodi guide for beginners. In either case, you can follow the steps mentioned below to remove the add-on from your Kodi software:
- Open Kodi. Click on the Add-ons section presented to your left-side menu
- If it’s a Video Add-on you need to remove, click on the Video Add-ons section.
- A list of Video add-ons will appear on your right side, so right-click on any add-on you want to remove.
- Select Information.
- A few options will appear on your screen. On the bottom right corner, you will find an option called ‘Uninstall.’ Click on it, and the add-on will uninstall.
What is a Kodi Repository?
Kodi Repositories are in the form of a Zip File that contains a collection of add-ons. When you have installed the best Kodi repositories, you can choose various add-ons to install from either the program add-ons section or the video add-ons section.
How to Install Kodi Repositories
In this Kodi user guide, you will learn to install Kodi repositories that allow you to expand your library with various new add-ons and content sources. Follow these simple steps to seamlessly add new repositories to your Kodi setup, enhancing your streaming experience with diverse multimedia options.
- Launch Kodi on your system, then go to the Settings icon. Click on File Manager.
- Now, scroll down and double-click on Add Source. Tap where it says ‘None.’
- Paste the repository URL. Press OK. Now, name the repository. Press OK.
- Go back to Kodi’s Main Menu. You must select Add-ons. Then click Box-icon on the top menu.
- Choose the Install from Zip File option. Tap on the repository. Now click on the repository zip file. Wait until the repository is installed.
- Now, go to Install from Repository. Select the repository from the list. Now, choose an add-on of your liking.
How to Remove Kodi Repositories
Removing Kodi repositories can help streamline your setup and eliminate unused or outdated content sources. This guide will show you the straightforward steps to safely remove repositories from Kodi, ensuring your system remains organized and efficient.
- Launch Kodi. Go to Add-ons, then tap on the above-located Box-icon.
- Select Install from Repository, then Right-click on the repository you wish to remove.
- Then select the Information option.
- A new screen will appear. Here, you need to select the Uninstall option.
- Now, click on the repository will uninstall.
What is a Kodi Wizard?
Kodi Wizard makes it easier for users to access Kodi add-ons and Kodi Builds. It further helps you to automate all the latest add-ons that are found in a repository. It is a program add-on that controls add-ons and Builds from a central location.
How to Install Kodi Wizards
Installing Kodi wizards simplifies configuring and enhancing your Kodi setup by automating the installation of add-ons, repositories, and settings. Follow these steps to effortlessly integrate wizards, making your Kodi experience richer and more user-friendly.
- Open Kodi. Select the Settings icon. Go to File Manager.
- Double-click on Add Source and tap ‘None.’ Copy/Paste the URL of the repository. Select OK.
- Type the name of the repository. Press OK to close the box. Go back to Kodi Home.
- Click on Add-ons, then on Package Installer (Box-icon), and choose Install from Zip File.
- When the box appears, click on the repository you named in Step 3. Now select the zip file.
- Choose Install from Repository. Then, select the repository from the list.
- Go to Program Add-ons, select the Wizard, and hit Install.
Wizards are handy for Kodi beginners or those seeking a Kodi manual because they offer a pre-configured setup that facilitates a smooth start to using Kodi.
How to Remove Kodi Wizards
Removing Kodi wizards can help declutter your Kodi interface and reduce system load, especially if you no longer need the extensive modifications they offer. This guide provides clear instructions on safely uninstalling wizards from your Kodi system, keeping it clean and optimized.
- Open Kodi. Go to Add-ons and then Program Add-ons.
- You will see the Kodi Wizard on the right side of the screen. Right-click on any Wizard you wish to remove.
- Select the Information option.
- A screen will appear where you must choose the Uninstall option at the bottom right.
- Your Kodi Wizard will now uninstall.
What are Kodi Builds?
As for choosing the best Kodi builds in 2024, the process remains relevant, with builds like the Xanax Build, No Limits Magic Build, and Titanium Build standing out.
These builds come pre-loaded with various add-ons and provide a user-friendly interface. They simplify the process, allowing users to enjoy a new look and a pre-selected array of streaming options. Builds are especially useful for beginners, as they provide a ready-to-go setup showcasing the best way to use Kodi. Follow the Kodi guide for beginners to get Builds:
How to Install Kodi Builds
Installing a Kodi build is similar to installing an addon but usually involves a few additional steps to transform Kodi’s interface and functionality completely.
- Choose Your Build: Select a build like Xenon, known for its vibrant interface and pre-installed add-ons.
- Install the Build: Follow the specific instructions for your chosen build, which typically involves adding a file source to Kodi, installing a repository, and then downloading the build.
Using Kodi with Installed Builds
Kodi builds and streamlines the user interface and integrates various add-ons for enhanced usability.
- Navigate the Build: Explore different sections like Movies or TV Shows, which change the submenu options accordingly.
- Access Pre-Installed Addons: In sections like the Debrid Zone, directly use the displayed addons for streaming.
- Explore Additional Addons: If the build’s home screen doesn’t show all available addons, go to the Add-ons section and select Video Add-ons to view all integrated into the build.
Adding Addons to a Build
Even after installing a build, you might need more specific add-ons. Adding these to your Kodi build is straightforward.
- Add the Addon Source: Input the source URL for the addon into Kodi.
- Install the Repository: From the added source, install the repository that houses the addon.
- Download and Install the Addon: Navigate the repository to find and install your desired addon.
This structure ensures a step-by-step guide to enhancing your Kodi setup, whether adding individual addons or entire builds.
How to Remove Kodi Build
You can remove the Kodi build by following the below steps of the Kodi guide for beginners
- Open Kodi Go to Add-ons, Then Program Add-ons
- Choose the Kodi Wizard from where you installed a Build
- When the Wizard is open, go to the Builds section
- Here, you will find an option, ‘Erase all data.’ Click on it, and the Build will be removed.
Another way to uninstall a Build is by installing the Fresh Start Kodi add-on and resetting Kodi to its default state.
What are Kodi Subtitles?
How often do you see a Movie or a TV Show with bad sound quality? Very often! Installing subtitles in Kodi videos will certainly make your life easier. It always makes an enjoyable experience to watch Videos with subtitles that make you understand the movie with ease.
- Open Kodi. Click on the Settings icon located at the top.
- Tap on the Player Settings.
- Select Language on the left-side menu.
- On the right side of the screen, under the Download Services section, Select the ‘Language to Download Subtitles for’ option and choose your Language for Subtitles.
- Click on the desired language. Then select OK.
- To assign subtitles for multimedia packages, click on Default TV Shows service under the same Download Services option.
- Click on Get More.
- Choose Subscene or OpenSubtitles.org by OpenSubtitles.
- It will take time to install Kodi Subtitles.
- Now do the same for Default Movie Service, located under Download Services.
- Now that you have configured Subtitles for Kodi, play a video from any movie add-on.
- Click on the Subtitles icon located at the bottom-right corner.
- Subtitles box will now appear. Click on the Download option.
- Subtitle Files will now appear on your screen for the video. Click on any file and then watch the Movie. Subtitles will appear on the video.
What are Fully-Loaded Kodi Boxes?
Fully loaded Kodi boxes are the ones that have pre-installed Kodi third-party add-ons. Meaning, you just need to buy these boxes and stream Movies, TV Shows, and Live TV all you want. It isn’t a very likable product in the eyes of copyright holders because these boxes let you watch media content.
Therefore, we advise you to get a legal Kodi box or an Android box and then install the Kodi app and Kodi add-ons on your own to spare any trouble. Here are the best Kodi streaming boxes that we recommend.
Legal Kodi Box
Legal Kodi boxes are the kind of boxes which doesn’t come up with pre-installed Kodi add-ons. It only contains the installed Kodi app, giving you all the necessary freedom to install either Kodi third-party add-ons or the official ones. It keeps you out of legal troubles with law enforcement because there is a crackdown against Kodi f-loaded boxes.
Kodi Problems/Errors/Issues
Below are some of the frequent problems that arise when using Kodi software. We have also provided solutions to those problems so that you can fix it without any hassle
This error occurs when the Kodi repository you are trying to install is either outdated or is being updated. It appears when it tries to install a Zip File.
Solution
Follow the steps highlighted below to fix this problem:
- Wait for the repository to get updated. Possibly takes a few hours in general
- Install a particular Kodi add-on from an alternate repository
- Check on the internet connection
Check Log Error
Check log error occurs when you try to access a Live TV channel that remains geo-restricted. Some of the channels you are trying to access are only available in their host country, so accessing these channels from outside their country of origin will prompt a check log error.
Solution
Tof o fix this problem, you need a Kodi VPN, as mentioned in this guide, to bypass geo-restrictions. A VPN has many different servers in many countries, so if the Live IPTV channel you’re trying to access is from the UK, then connect to a UK server and watch the channel on Kodi. Further, a Kodi VPN also keeps your online activity anonymous.
Could Not Connect to Repository
This error appears when you have inserted a wrong Repository URL or are not connected to the internet. When you insert a URL, Kodi checks whether it is an authentic URL with the help of an internet connection. It will pose an error if you don’t have an internet connection.
Solution
The fix for this problem is really simple. Follow the instructions as defined below:
- Check on your internet connection.
- Double-check on your Repository URL.
- Ensure you have inserted a slash (/) at the end of the URL.
- To see if the URL is working, paste the URL on the web address.
How to Factory Reset Kodi
Follow the below steps to reset Kodi:
- Open Kodi. Go to the Settings option at the top, then select File Manager.
- Double-click Add Source. Tap on ‘None’ Paste the URL https://dimitrology.com/repo/. Press OK
- Name the repository as ‘Dimi.’ Press OK to close the box.
- Return to Kodi Main Menu. Click on Add-ons, then tap on the Box icon.
- Choose Install from Zip File. Select Dimi. Go on to click plugin.video.freshstart-1.0.5.zip. Wait for the add-on to install.
- Go back to Kodi Home. Click on Add-ons, then Program Add-ons. Click Fresh Start.
- Now, select Restore Kodi to default Settings. Restart Kodi, and you’re done!
How to Update Kodi
Every other month, you will find a new Kodi version with some new features. To stay updated, you will need to update your existing Kodi version.
The latest Kodi version is 18.4 and I will show you how to update Kodi with a tried and tested method.
Updating to Kodi 18.4 from Within Kodi Itself
- Launch the FireStick Main Menu, then click on Settings.
- Select Applications. Tap on Manage Installed Applications. Select and open Kodi.
- Once you have launched Kodi, click on the Add-ons menu. Then select the Package Installer (Box-shaped) icon located at the top.
- Now, you have to select Install from Repository. Scroll down to select Kodi Add-on Repository.
- Go to Program Add-ons, then scroll down to find Kodi Android Installer and click on it. Press Install.
- A notification will pop up in the top-right corner to notify you if your add-on is installed.
- Go back to Kodi’s Home Screen. Select Add-ons >Program Add-ons. Click on Android Installer.
- Once you open Android Installer, it will present you with various options, i.e., Nightly, Releases, Snapshots, and Test-Builds. Click on Releases.
- Now, select Arm Kodi Release. Then, choose Kodi-18.4-Krypton-armeabi-v7a.apk.
- The installation for Kodi 18.4 will start automatically
- Once the download completes, a dialogue box will appear asking your permission if you want to install a Kodi update. Click on Install.
- Once the download is completed, open Kodi and enjoy the FireStick update! If you feel your Kodi is not working on FireStick, then you must repeat these steps.
Kodi Keyboard Shortcuts Guide
Here’s a comprehensive Kodi guide for beginners to use Kodi more efficiently with keyboard shortcuts. This table categorizes the shortcuts by their function, making it easier for you to learn and apply them during use:
| Shortcut Key | Function |
|---|---|
| C | Open Contextual Menu |
| H | Switch to Live TV Window |
| Ctrl + Right Arrow or Ctrl + Left Arrow | Seek Forward or Backward |
| Page Up/Page Down | Move to Queued Video |
| Tab | Toggle Fullscreen Playback |
| M | Mute |
| Ctrl + End | Exit Kodi |
| \\ | Toggle between Full-screen and Windowed Mode |
| A | Audio Delay Control |
| F | Fast Forward |
| P | Play |
| X | Stop |
| R | Rewind |
| T | Toggle Subtitles On/Off |
| Esc | Previous Menu or Home Screen |
| Ctrl + S or Prt Sc | Take A Screenshot |
| – (Minus), + (Plus) | Volume Down, Volume Up or Mute |
| S | Shut down Menu |
| Space Bar | Pause / Play |
| Z | Zoom / Aspect Ratio |
| 1-9 | Zoom Picture From Level 1 to level 9 |
| . | Next Picture |
| , | Previous Picture |
| + | Zoom In |
| – | Zoom Out |
| Ctrl+Shift+D | Toggle Debug Logging |
| Ctrl+Shift+O | Get Codec Info |
| Alt + Left Arrow/Right Arrow | Adjust Playback Speed |
| Y | Select/Switch player |
| Left-click | Select an Item |
| Middle-click | Queue to Playlist |
| Right-click | Access Context Menu |
| Right-click on blank area | Go Back |
| Mouse Wheel Up | Go Up |
| Mouse Wheel Down | Go Down |
| Windows Key | Access Windows Options Outside Kodi |
| Cmd + Q | (Mac) Quit Kodi |
| Cmd + H / Cmd + M | (Mac) Hide/Minimize Kodi |
| Cmd + F | (Mac) Toggle Fullscreen |
| Cmd + S | (Mac) Take a Screenshot |
Best VPNs for Kodi
Using a VPN with Kodi is crucial for enhancing your streaming experience by ensuring privacy and bypassing geographic restrictions. A VPN masks your IP address, keeping your browsing activities private and securing you from potential legal scrutiny when streaming from various sources.
ExpressVPN is highly recommended for Kodi users due to its fast speeds, strong encryption, and extensive server network. It is among the best VPNs for Kodi because it provides smooth and secure streaming, reducing the risk of buffering and providing seamless access to geo-restricted content. Choose ExpressVPN for an optimized Kodi experience.
Top VPN Picks from Reddit for Enhanced Kodi Streaming
For those navigating the complexities of VPNs for Kodi, a Reddit thread offers many user-endorsed suggestions. Prominent recommendations like ExpressVPN and NordVPN are noted for their fast speeds, providing other regions IP addresses, and comprehensive security features, making them top choices for overcoming geographical restrictions.
Discussion highlights emphasize the importance of VPN performance across various devices. IPVanish is favored for compatibility with devices like Amazon Firestick, whereas CyberGhost is appreciated for its ease of use, particularly beneficial for less technical users.
Kodi veterans on Reddit advise taking advantage of VPN free trials and money-back guarantees to find the optimal service. They also recommend selecting a VPN with a stringent no-logs policy, ensuring private and secure streaming tailored to personal usage and device preferences.
Kodi Alternatives
There is nothing like Kodi that streams all the latest media content by adding a list of Kodi add-ons. A few have reached up to Kodi’s potential but haven’t yet made an impressive run. What makes Kodi best among all digital media software is its ability to be open-source. View our complete guide on how to take the measure of each alternative.
| Software | Description |
|---|---|
| Stremio | Stremio offers a design similar to Kodi for streaming media. It supports official and third-party add-ons with a simple one-click installation process. |
| Plex | Plex organizes media files and streams metadata-based content. Secure access often requires the best VPNs for Plex, as many add-ons are outdated or non-functional. |
| OSMC | Developed by the creators of Kodi, OSMC features a similar interface but only streams content from local storage and lacks support for third-party add-ons. |
More Guides of VPNRanks Related to Kodi
- Best Kodi Addons: Unlock Entertainment with Top Kodi Addons Available
- Install Kodi on FireStick: Stream Seamlessly with Easy Kodi Installation on FireStick
- Fix Kodi Not Working: Resolve Quickly to Get Your Kodi Running Smoothly
- ExpressVPN Kodi – Easy Set Up: Secure Streaming with Effortless ExpressVPN Setup on Kodi
- Install NordVPN on Kodi: Enhance Privacy with NordVPN on Kodi for Safe Streaming
- Install CyberGhost for Kodi: Stream Securely with CyberGhost on Kodi
FAQs – Kodi Guide for Beginners
What is Kodi for dummies?
Kodi is a versatile, award-winning media player and entertainment hub that’s free and open-source. Available for Linux, OSX, Windows, iOS, tvOS, and Android, it features a “10-foot user interface” optimized for television viewing and is easily navigable with a remote control. Ideal for beginners in the USA, Kodi simplifies accessing and organizing media from various platforms.
What do people use Kodi for?
People use Kodi for watching and recording live TV via a user-friendly interface, compatible with various backends like MediaPortal, MythTV, NextPVR, and others. Beyond just media consumption, Kodi can also be used to play games.
Can you still stream movies with Kodi?
Yes, you can stream movies with Kodi, but it requires add-ons since Kodi is just a media player. These add-ons allow you to watch movies, listen to music, and more. You can also play video files directly from your device.
What are the benefits of Kodi?
Kodi’s flexibility is a major benefit, as it is highly customizable with the ability to add various add-ons and plugins. These enhancements enable access to a vast array of content, including streaming services, TV channels, music, and podcasts.
Is it legal to watch Netflix on Kodi?
Watching Netflix on Kodi is legal if the content is streamed from an official source like Netflix itself. However, streaming from unofficial sources such as torrent sites is illegal.
Is Kodi completely free?
Yes, Kodi is a free and open-source media player and technology convergence software developed by the Kodi Foundation, a non-profit technology consortium.
How do you use Kodi for Live TV?
You can watch live TV on Kodi by using specific IPTV add-ons designed for live TV transmissions. For example, the Ultimate IPTV add-on can be installed to access live TV.
Do I really need a VPN to use Kodi?
Using a VPN with Kodi is essential to bypass geo-restrictions on content from add-ons like BBC iPlayer, ESPN, and Hulu. A VPN masks your location, making restricted content accessible regardless of your region.
What is the safest way to use Kodi?
The safest way to use Kodi is a VPN like ExpressVPN, which hides your IP and encrypts your internet traffic. ExpressVPN uses 256-bit AES encryption, a high-security standard used globally by governments and military institutions.
Wrap Up!
Following the provided Kodi guide for beginners makes setting up software straightforward, allowing you to enjoy the latest shows, movies, and sports. This approach guarantees access to a wide range of content that matches your streaming preferences.
To ensure a secure and unrestricted streaming experience on Kodi, particularly with geo-restricted content, I suggest using ExpressVPN. It will enhance your streaming capabilities by overcoming geographical limitations and protecting online privacy.
Keep the suggestions of the Kodi guide streaming setup. Equipped with the appropriate add-ons and ExpressVPN, you’re all set to enjoy a diverse selection of media from across the globe, making your streaming experience enjoyable and extensive.
Recent Comments 2
Hello… OSMC is fully capable as a KODI platform. On OSMC you can install any KODI based third-party add-ons to stream free media content
Hey RC, yes you’re right. OSMC is a complete Kodi platform. Cheers!