Even though using NordVPN is a great way to secure your online security and privacy in Australia, installing it on a router is even better. By following this guide on how to install NordVPN on router in Australia, you will be able to encrypt traffic from all of your connected devices at once and benefit from features like network-wide protection and unrestricted simultaneous connections.
You can also have a VPN connection even on VPN-unsupported devices such as gaming consoles and streaming devices, you can also use NordVPN on Apple TV. However, not all routers support user-friendly settings or work with NordVPN. Check first to see if your router supports VPN connections. For that, you can simply log into the router and search the menus for VPN options, or you can ask the manufacturer (who is your ISP most of the time).
NordVPN is one of the most secure and best VPNs for Australia tested and recommended by us. We’ll walk you through every step in this article so you can easily and smoothly set up NordVPN on your router in Australia. Let’s get started.
Which router should I use with NordVPN in Australia?
If your ISP provided your existing router, it most likely does not support OpenVPN. A thing to remember before knowing how to install NordVPN on router in Australia is that with standalone routers, some mesh routers also support OpenVPN as well.
If your present router is incompatible, you might need to get a new one from the brands we suggest, or you might visit FlashRouters and purchase a router with specialized software that functions with a companion app. With that app, you can control your VPN settings more conveniently than in a web browser and log in using your NordVPN credentials. Use the discount code “NORDVPNROUTER“ at check out to receive 20% off.
Moreover, You can also use Asus routers, which come with an integrated OpenVPN client, making them perfect for NordVPN. You can also check out the best VPNs for routers in Australia other than NordVPN.
Here you can see the list of routers that NordVPN recommends.
Routers Supported by NordVPN in Australia
| Manufacturer | Router |
| Asus | RT-AX86U, RT-AX88U (AX6000), RT-AC66U B1, RT-AC5300, RT-AC86U, Asus RT-AX3000 |
| Netgear | R7500, R7800, R8500, R9000 |
| Linksys | EA8500, WRT3200ACM, WRT1900ACS |
| D-Link | DIR-895L, DIR-885L |
*All require a DD-WRT flashing.
Now that we have gotten that out of the way let’s check out the NordVPN Asus setup. Another big advantage of setting up a VPN connection on a router is that those devices which don’t support native NordVPN applications or manual configuration, such as a few specific models of Nvidia Shield, can now easily be protected with NordVPN in Australia.
Nevertheless, if you still wish to set up NordVPN on your NVidia device, then we recommend following the steps in our Nvidia Shield steps by NordVPN article.
How to set up NordVPN on your router in Australia
Although many router manufacturers use a similar procedure for setting up a VPN on a router in Australia, there are several distinctions to be aware of. We’ll walk you through the process of setting up NordVPN in Australia on several routers to make things simpler for you.
These are the initial steps for installing how to install NordVPN on router in Australia:
- Get the configuration files downloaded. To achieve this, you must download the available protocols and locate the server that performs the best. Click Here to find the best-preferred server for you.
- Find the IP address of your router. The IP address of your router is often located on the bottom or rear. Here is how it will appear: 192.168.1.1
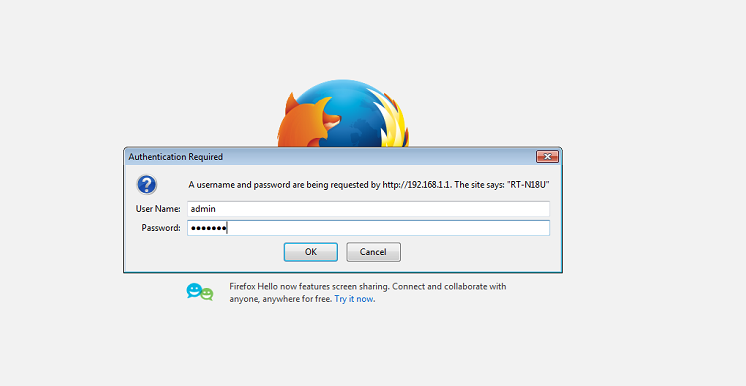
- Fill out the browser’s URL area with your IP address. You’ll need to enter your password, which is right next to the router’s IP address.
Type your password in if you have manually changed it.
Note that: This how-to install NordVPN on router in Australia procedure will thereafter vary according to the routers, supported firmware, and other parameters.
How to Install NordVPN on Router in Australia (ASUS)
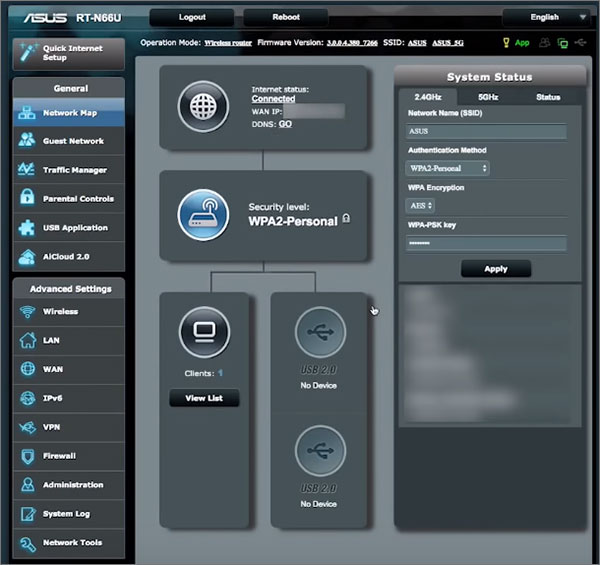
The Asus stock firmware is easy to navigate around and change settings. To set up the NordVPN ASUS router in Australia, follow the instructions below:
Step 1: Purchase a NordVPN subscription or go for free NordVPN with premium features for 30 days.
Step 2: Log in to your Asus router by using the appropriate URL in your browser (usually 192.168.1.1).
Step 3: Enter your Asus username and password when prompted to do so.
Step 4: Click on the VPN tab in the sidebar.
Step 5: Select the VPN client tab and click on Add profile
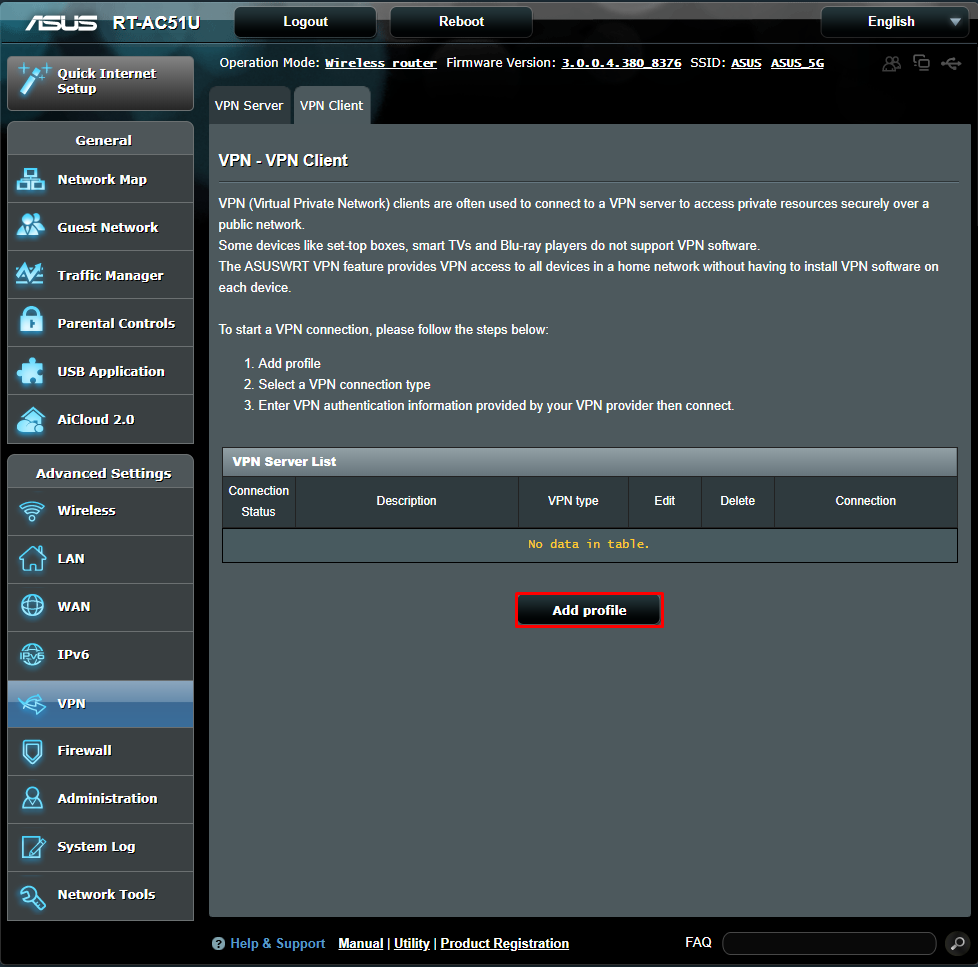
Step 6: Now choose the OpenVPN tab and insert the following information
- Description: Give a name to the connection as you like
- Username: Enter your NordVPN username
- Password: Enter your NordVPN password

Step 7: To import the .ovpn file, you first need to download these files from NordVPN’s server utility. Choose a server, and adjust server preferences to find its configuration files. Next, click on “download config.”
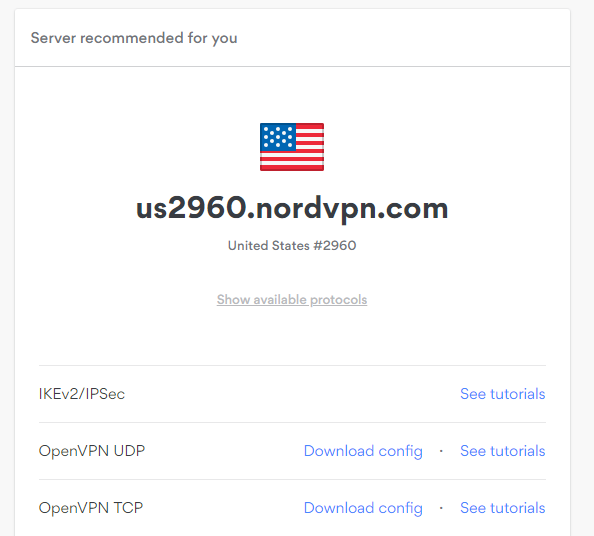
Step 8: Now import these downloaded files after clicking on “Choose file” in the dialog box shown in step 5 and click. Make sure the “Import the CA file or edit the .ovpn file manually” is left unchecked.
Step 9: When the upload is finished, click OK
Step 10: Now click on WAN in the sidebar, select no in the Connect to DNS Server automatically, and enter the DNS server addresses as DNS 1 and DNS 2, respectively:
- 8.8.8.8
- 8.8.4.4
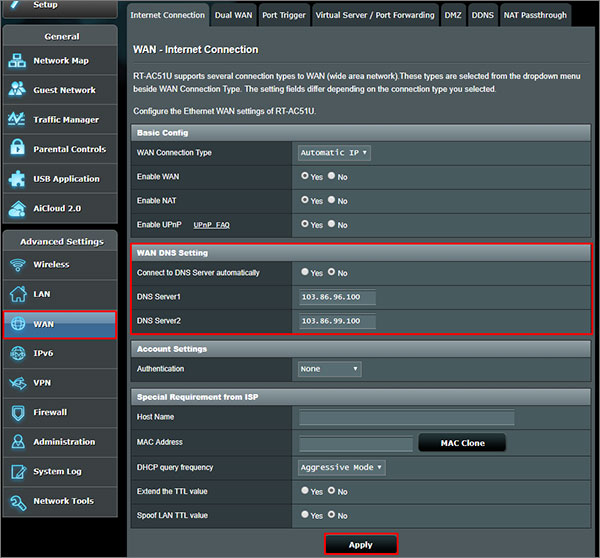
Step 11: Click on Apply.
Step 12: Go back to the VPN client tab and click on the Activate button to initiate NordVPN on your router in Australia.
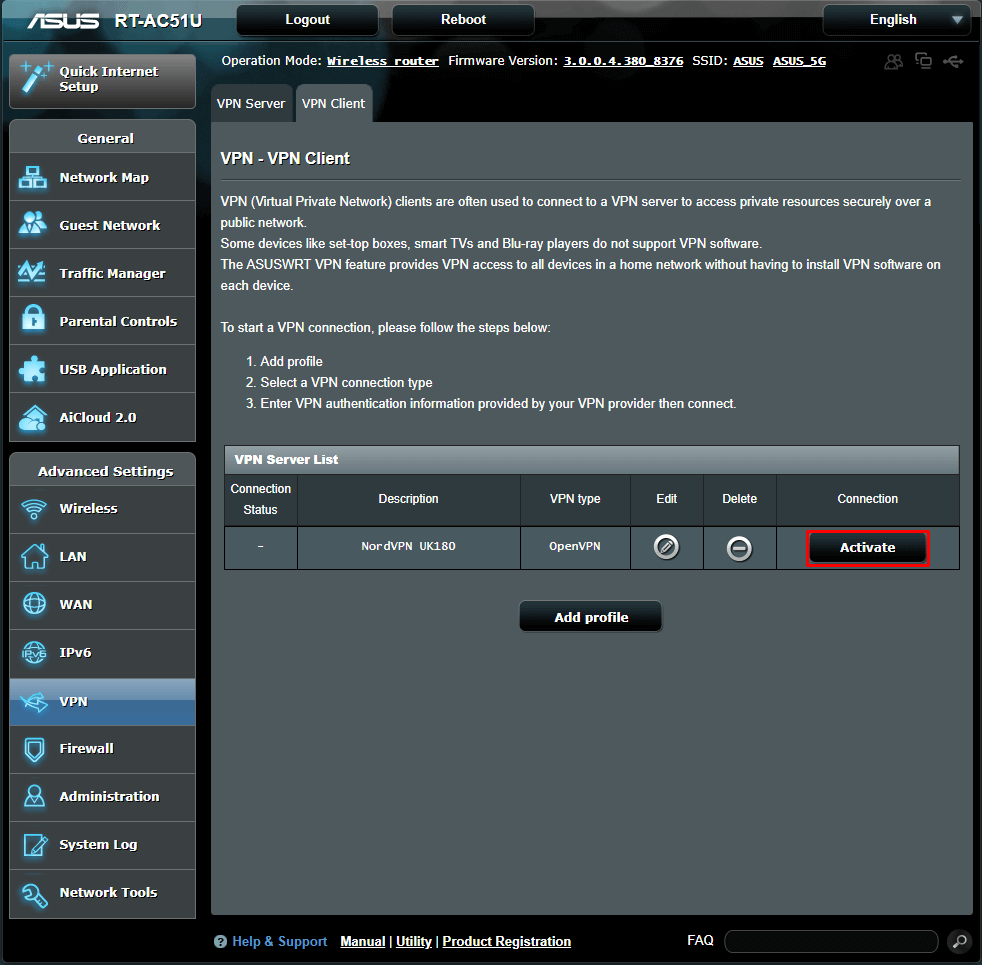
Step 13: A blue tick will appear next to the Connection Status if the connection is successful.
See Also: NordVPN configuration for Mikrotik
These steps will get NordVPN working on the ASUS router in Australia. Now you’ll never have to enable NordVPN before streaming Netflix with NordVPN in Australia. But if something goes wrong, you can check out our NordVPN not connecting guide.
Also, setting up NordVPN on the Router in Australia allows you to skip configuring NordVPN on complicated devices such as Linux. If you still wish to know how to set up NordVPN manually on Linux, we recommend checking out our guide on NordVPN’s configuration for Linux.
How to Set up NordVPN with DD-WRT
DD-WRT configuration may appear difficult at first, but don’t worry! You can quickly get it going if you follow this step-by-step guide:
Step 1: Navigate to “Setup” in the Administrative Interface and then select “Basic Setup.” Set the following NordVPN DNS addresses in the section titled “Network Address Server Settings (DHCP),” as mentioned in the below pic:
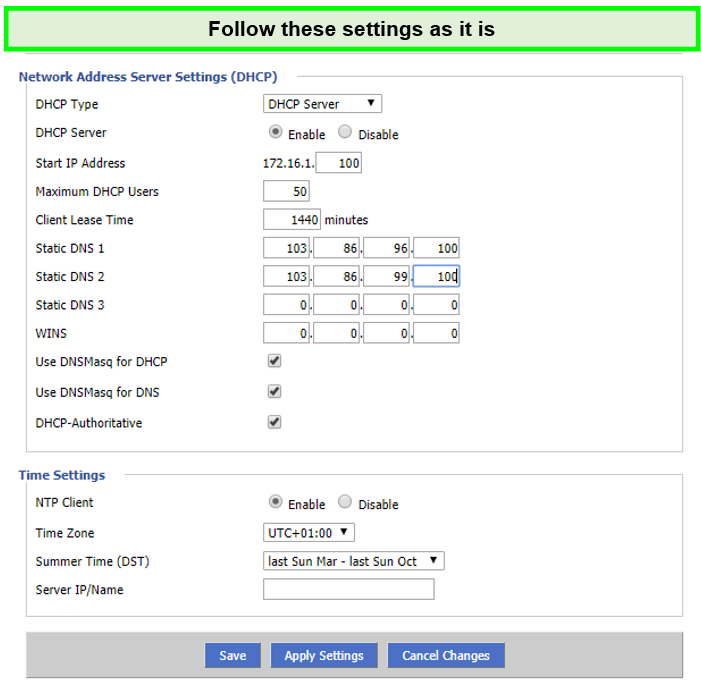
Step 2: Click “Save” and then “Apply Settings.”
Step 3: Disable the IPv6 protocol by going to the “Setup” tab, then finding the “IPv6” tab. Click “Save” and then “Apply Settings.”
Step 4: After “Setup,” select VPN. Set “Start OpenVPN Client” to “Enable” in the “OpenVPN Client” section. Set the following options as follows:

Step 5: Copy and paste the following commands into the Additional Config box:
remote-random
nobind
tun-mtu 1500
tun-mtu-extra 32
mssfix 1450
persist-key
persist-tun
ping-timer-rem
reneg-sec 0
#log /tmp/vpn.log
Step 6: Open the configuration file that was downloaded in any text editor (we recommend WordPad or Notepad++). You ought to see the relevant portion of the file after opening it.
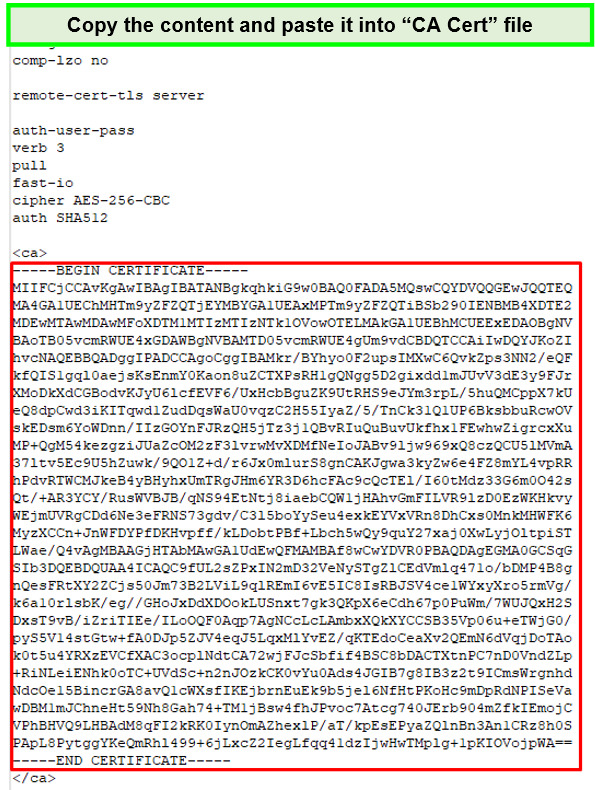
Step 7: From the start of the command to the end of the certificate, copy the content and paste it into the “CA Cert” box.
Step 8: To find the part, return to the configuration file and scroll down. Paste it into the TLS Auth Key field after copying its contents.
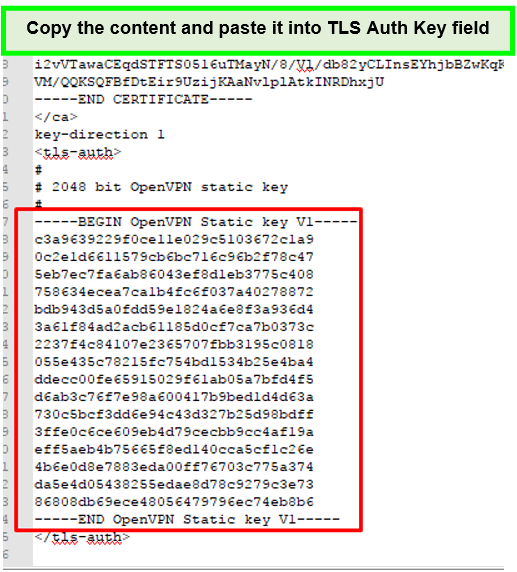
Step 9: Click “Apply Settings” and “Save” after pasting.
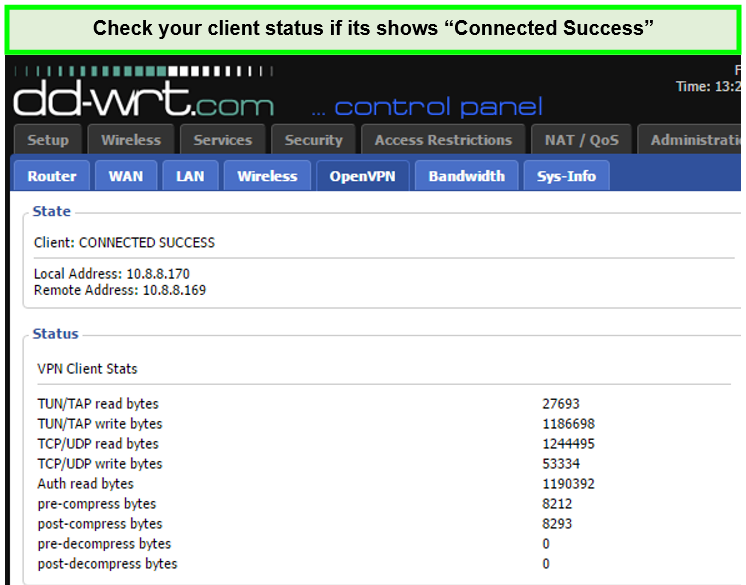
Step 10: Navigate to “Status,” then “OpenVPN,” and search for “Client: Connected Success” to confirm the connection was successful.
Moreover, visit here to check out more VPNs for DD-WRT routers.
How to set up NordVPN with OpenWRT
Setting up NordVPN with OpenWRT is a pretty simple process in Australia. This is how you do it:
Step 1: You should connect to the OpenWRT firmware using the IP address 192.168.1.1 since it only supports the telnet protocol. Use the “passwd” command to modify the root password. The router will then approve an SSH connection after that. Following that, you must install:
- opkg update
- opkg install openvpn-openssl
- opkg install ip-full
Step 2: Every time the OpenVPN router starts, the NordVPN OpenVPN settings will prompt you for your login and password. To automatically enter credentials, insert the word “secret” with a space before the string auth-user-pass.
The generated string should be something like “auth-user-pass” secret.
Step 3: The credentials are entered in a file called “secret” that is created in the same folder. Your username for the NordVPN service is on line one, and your password is on line two.
Step 4: There are two methods for configuring OpenVPN using the configuration file:
- Change the file’s extension from.ovpn to.conf so that OpenVPN can recognize it automatically.
- Put the file name in the /etc/config/openvpn directory. You may use uci:
uci set openvpn.nordvpn.enabled=’1′
uci set openvpn.nordvpn.config=’/etc/openvpn/al1.nordvpn.com.tcp.ovpn’
uci commit openvpn
The following strings should be attached to the file as /etc/config/openvpn:
config openvpn ‘nordvpn’
option enabled ‘1’
option config ‘/etc/openvpn/al1.nordvpn.com.tcp.ovpn’
Step 5: Additionally, you can specify the file in the file /etc/config/openvpn by changing the file’s extension ovpn to.conf. In this scenario, OpenVPN will launch only once with this configuration file.
Step 6: New network interface creation. Remember that there are 2 alternative ways to accomplish this, and it is advised to use both simultaneously. The suggested interface approach is:
uci set network.nordvpntun.proto=’none’
uci set network.nordvpntun.ifname=’tun0′
uci commit network
The following added strings should be present in the file as /etc/config/network:
option proto ‘none’
option ifname ‘tun0‘
Step 7: Add a new firewall zone and a forwarding rule from LAN to VPN:
uci set firewall.@zone[-1].name=’vpnfirewall’
uci set firewall.@zone[-1].input=’REJECT’
uci set firewall.@zone[-1].output=’ACCEPT’
uci set firewall.@zone[-1].forward=’REJECT’
uci set firewall.@zone[-1].masq=’1′
uci set firewall.@zone[-1].mtu_fix=’1′
uci add_list firewall.@zone[-1].network=’nordvpntun’
uci add firewall forwarding
uci set firewall.@forwarding[-1].src=’lan’
uci set firewall.@forwarding[-1].dest=’vpnfirewall’
uci commit firewall
The following appended strings must be present in the file /etc/config/firewall:
option name ‘vpnfirewall’
option input ‘REJECT’
option output ‘ACCEPT’
option forward ‘REJECT’
option masq ‘1’
option mtu_fix ‘1’
list network ‘nordvpntun’
config forwarding
option src ‘lan’
option dest ‘vpnfirewall’
Step 8: Set up the DNS servers. The simplest method is using NordVPN DNS for the router’s WAN interface. How to Add NordVPN DNS is as follows:
uci del network.wan.dns
uci add_list network.wan.dns=’103.86.96.100′
uci add_list network.wan.dns=’103.86.99.100′
uci commit
The section ‘wan’ of the file /etc/config/network should include the following attachments (the three bottom strings have been added):
option ifname ‘eth0.2’
option force_link ‘1’
option proto ‘dhcp’
option peerdns ‘0’
list dns ‘103.86.96.100 ‘
list dns ‘103.86.99.100’
Upon completing these instructions, everything ought to be set up, and you ought to be effectively connected. Visit the homepage of NordVPN router manager and look for Protected status at the top to confirm.
What to Do if NordVPN Router Is Not Connecting in Australia?
There are several possible reasons why NordVPN might not be connected in Australia after a successful router setup. If you know how to install NordVPN on router in Australia and the router still fails to connect, try the following solutions to fix this:
Check the Status of Your Router
Despite being fairly basic, users frequently fail to notice connectivity issues indicated by the router status lights. They blame NordVPN for this. So, if you’re having trouble connecting, look for any amber or off status lights on your router. This could mean that there is a problem with your internet connection.
Reset Your Router
Turning off your router if you are certain that you have installed NordVPN or have connected in the past. Turn it back on after at least 2 minutes. By refreshing your router’s setup, you can resolve any router issues in Australia that you might not be aware of while still maintaining your NordVPN settings.
Update the Firmware on Your Router
Checking for firmware updates may be beneficial if your router is one of the versions that can be used with NordVPN in Australia. Try updating the router firmware if you use an older version, then refresh your connection.
You might need to reconfigure or reinstall nordVPN to work with the updated firmware. We suggest contacting NordVPN support if you are still experiencing issues connecting. Alternatively, ask the company that made your router if they have any other recommendations.
Why You Should Configure NordVPN on Router

- 5100+ servers in 60+ countries
- Military-grade encryption (Double VPN encryption)
- CyberSec protects your device from intrusive ads
- Strict no-logs policy
- Automatic Kill Switch
- DNS leak protection
- 6 Multi-logins
- Live chat support
- Easy-to-use app
There are several reasons why having NordVPN on your router in Australia can be quite valuable. For one, it can be super helpful if you’re in a heavily restricted country like China, where you can’t risk accidentally not connecting to a VPN. By the way, NordVPN actually works in China.
Here are some of the other reasons you should know as well:
- Always Stay Connected: You will always be connected to the VPN as soon as you hook your devices to your router’s connection. This means you’ll never forget to turn on a VPN to initiate a secure browsing/streaming/torrenting session. Speaking of torrenting, you might find this NordVPN torrenting guide in Australia useful.
- Fast speeds: Since NordVPN proved to be super fast in our speed test, if you configure it on your router, you will experience speeds like never before for streaming and everything else.
- Stream without restrictions: By configuring NordVPN on your router in Australia, you get the freedom to bypass geo-blocks without worrying about enabling your VPN every time you connect to the internet. Regarding configuring NordVPN, you might also be interested in learning how to set up NordVPN on FireStick in Australia, NordVPN on Kodi in Australia, and on Roku devices. You can also easily stream popular restricted content in Australia.
- One-time setup: Setting up a VPN on a router in Australia is only a one-time process. You will simply have to connect your device to the home Wi-Fi to automatically come under VPN protection. Literally, that’s all you need to do. This way, you can use NordVPN on Smart TVs, gaming consoles, even NordVPN on LG Smart TVs, and more.
- No VPN Compatibility Issues: While NordVPN is compatible with many devices, no VPN can support every other electronic gadget or device that industries are churning out every other day. But if your router is running NordVPN, then the question of compatibility with other devices becomes irrelevant. For example, setting up NordVPN on Xbox would be a lot hectic if you simply configure NordVPN on the Router first. Similarly, using a NordVPN on Router can save you from configuring NordVPN on a Raspberry Pi device.
- Works with Multiple Devices: All you need to give a VPN-enabled connection to whatever device you need a VPN for is to simply turn on its Wi-Fi. Since NordVPN tp-link router setup is installed within the router itself, your device will automatically receive an internet connection that is integrated with the VPN. You can connect as many devices to your NordVPN connection as your router can support it. For more information on how NordVPN works, you must read our full NordVPN in-depth review in Australia.
Routers Not Compatible with NordVPN in Australia
Here is the list of following routers which are not compatible with NordVPN in Australia:
- Arris
- Belkin
- D-Link
- Netgear
- Cisco
- Huawei
- Tenda
- Linksys (excluding WRT32X/WRT32XB AC3200)
- TRENDnet
- TotoLink
- Ubee
Most of the above-mentioned routers are provided by ISPs.
If you want to know how to set up NordVPN on the router in Australia that includes one of these, then you will have first to flash the firmware and set up DD-WRT.
FAQs – How to Install NordVPN on Router in Australia
Can NordVPN be setup on router in Australia?
Yes, learn how to install NordVPN on the router in Australia by following the steps below:
- Open the network-connected browser on your device.
- Enter the login information for your router (username and password).
- Find and enable the VPN option under “Advanced,” “Advanced configuration,” or a section with a similar name.
- Please be aware that the process can significantly change based on your router model.
What router works best with NordVPN in Australia?
Following are some of the top suggestions based on your requirements:
- For 2–7 devices, Netgear R6400 is more affordable and compatible with all VPNs.
- If you want to use it for 10–15 devices, then an Open-source DD-WRT router, Linksys WRT3200ACM, is a suitable option.
- For 15+ devices, use Asus RT-AC5300; it’s an extremely quick, simple setup with a maximum Wi-Fi range.
Does NordVPN work with all routers in Australia?
yes, NordVPN works will almost all routers in Australia. If a Wi-Fi router supports OpenVPN, it should also support NordVPN. We advise using some of the top VPN routers found on flashrouters.com for a quick and secure experience.
Which router should I use for NordVPN in Australia?
We recommend you use the Asus routers for NordVPN in Australia because Asus routers have a built-in OpenVPN client that requires little effort to set up. At the same time, other routers need to have their firmware flashed, which can be difficult and is not supported by all systems.
Does NordVPN work with TP-Link routers in Australia?
Yes, Log in to your TP-Link VPN router’s control panel to configure a VPN connection to a NordVPN server. On most occasions, it can be reached via the internet by using one of the following IP addresses.
An OpenVPN connection is the best option if you want to set up a VPN connection on your router in Australia or have more than six devices connected simultaneously to one NordVPN account. Go to Advanced and then choose VPN Client. After enabling VPN Client, save the configuration.
Does NordVPN protect routers in Australia?
Yes, NordVPN protects your router in Australia and your entire hardware without running the danger of speed reduction. NordVPN will keep your online activity private and safe in Australia, whether it’s on your router or other devices.
How do I install NordVPN directly to modems or routers in Australia?
To know how to install NordVPN on routers in Australia, you must use dd-wrt setup or other third-party firmware like OpenWRT.
Final Thoughts
NordVPN doesn’t support many router models. Nonetheless, if you are an Asus user, then you can enjoy the outstanding experience of running NordVPN on a router in Australia and bring the security of all your devices under the fold of a VPN’s protective layers.
I hope this guide has helped you enough to know how to install NordVPN on router in Australia and how you can hide your online activity and mask your original IP address to another level. You can secure multiple devices at once and never worry about turning off or on your VPN connection.
Best of all, NordVPN is super affordable. But if you want to try it out or are unsatisfied with it, you can always cancel your NordVPN subscription and get fully refunded. You can also check out our Surfshark vs NordVPN comparison to see which one is the best option for routers in Australia.