- Download the Kodi OpenVPN plugin on your Raspberry.
- Transfer the downloaded .zip file to your Kodi device.
- After the .zip file is moved to the media center, launch Kodi and navigate to System > Settings > Add-ons. Now, click on Install from the zip file.
- Find the folder where the .zip file is copied and install it.
- When the Kodi OpenVPN add-on is enabled, you will see the notification in the window’s bottom-right corner.
- Now, create a new .txt file with your username in the first line and password in the second. Give the file any name you want, such as nordvpnpass.txt.
- Now visit https://nordvpn.com/servers/tools/ and download the .ovpn files of your desired NordVPN servers.
- Open the downloaded file and edit the auth-user-pass line to contain the location where you want to store the nordvpnpass.txt file on your Kodi. It should look like this: auth-user-pass /location/of/nordvpnpass.txt
- Transfer both files to your Raspberry Pi.
- Open the OpenVPN add-on you installed earlier and use it to find the .ovpn configuration file that you moved to the media center to connect to the VPN.
Using NordVPN on Kodi allows for secure, unrestricted access to your favorite streaming content while maintaining your privacy. Many Kodi users face geo-restrictions, blocked content, and potential malware threats in New Zealand.
Installing NordVPN not only enhances your streaming experience but also protects your online activities with strong AES 256-bit encryption. With NordVPN’s 6000+ servers, you can bypass throttling and access content from around the globe.
This is partly why NordVPN is considered one of the best VPNs for Kodi in New Zealand. Moreover, NordVPN comes with a 30-day money-back guarantee, providing a risk-free way to experience its benefits. Let’s get started and optimize your Kodi experience with NordVPN.
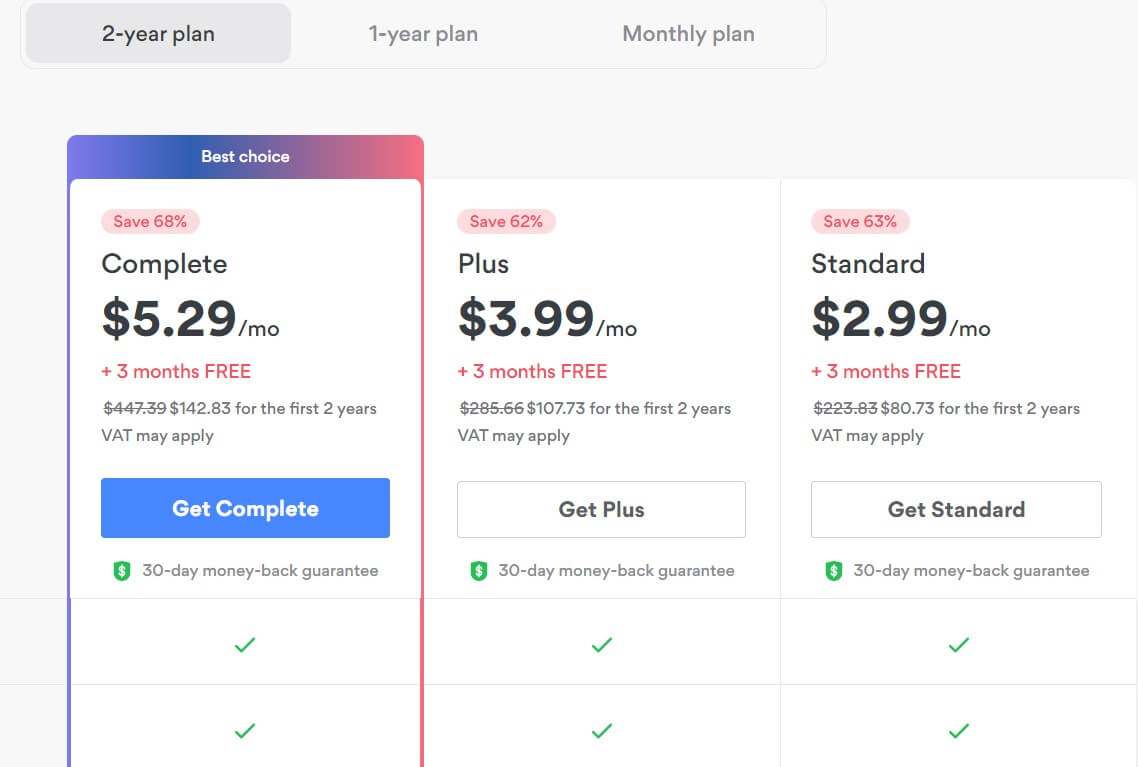
Note: If you still haven’t subscribed to NordVPN, here is the best chance to avail yourself of an exclusive offer – 68% OFF. You can even register for the service and pay for a NordVPN subscription via PayPal in New Zealand.
How to Install NordVPN on Kodi in New Zealand: Quick Guide
Here are the quick steps on how to install NordVPN on Kodi in New Zealand:
- Subscribe to NordVPN service.
- Download and install the app for your Kodi device.
- Connect to your preferred server.
- Open Kodi and enjoy streaming!
Get NordVPN for Kodi in New Zealand 30 Days Money Back Guarantee
Why should I Use NordVPN on Kodi for Streaming in New Zealand?
Kodi is a free and open-source media player. Even though it provides a wealth of content, certain risks are involved. It is therefore highly recommended that Kodi be used with extra security measures.
Here I have mentioned a few good reasons why installing a VPN with Kodi in New Zealand is worthwhile.
- Removing Geo-Restrictions: Overcoming geographical restrictions for exclusive services like Hulu or BBC iPlayer is essential. A top-tier VPN facilitates seamless access, ensuring a smooth browsing experience and unlocking a plethora of content. A specialized Disney+ VPN becomes crucial for Marvel enthusiasts, enabling immersive viewing of the extensive collection from any location.
- Avoid legal issues: Some Kodi add-ons may include copyrighted content. So, to avoid legal issues from the copyright holder, your best option is to use a VPN that encrypts your traffic and hides your actions so you can anonymously stream any content you like.
- Improved security against hackers: Some Kodi add-ons include malware, whereas others try to reveal security loopholes in your network. Since using a VPN can hide your real IP, this improves your online security and reduces the chance of being hacked.
How to Add NordVPN on Kodi in New Zealand
There are two primary methods that you can use for Kodi NordVPN setup in New Zealand. Both methods are quite simple, so you can choose whichever method seems easier.
NordVPN on Kodi Method 1: How to Setup NordVPN on Kodi in New Zealand through Dedicated App
1. Purchase a NordVPN subscription or go for the free trial of NordVPN in New Zealand instead.
Purchase a NordVPN subscription.
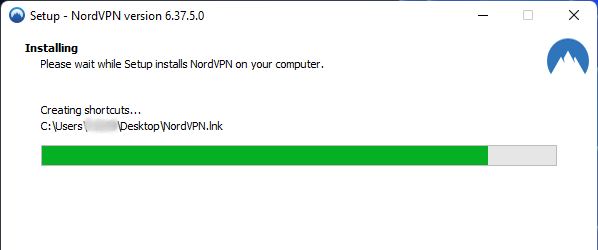
Install NordVPN on your device.
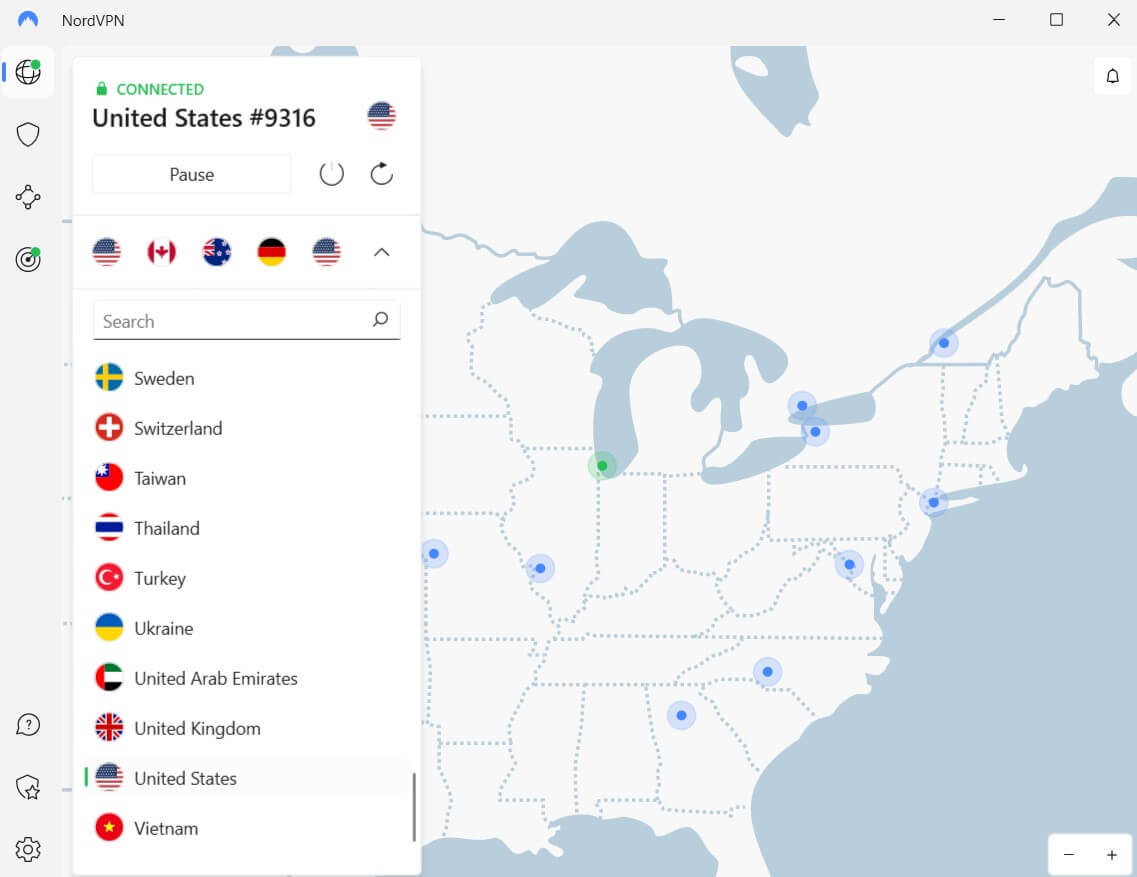
Select a server location of your choice.
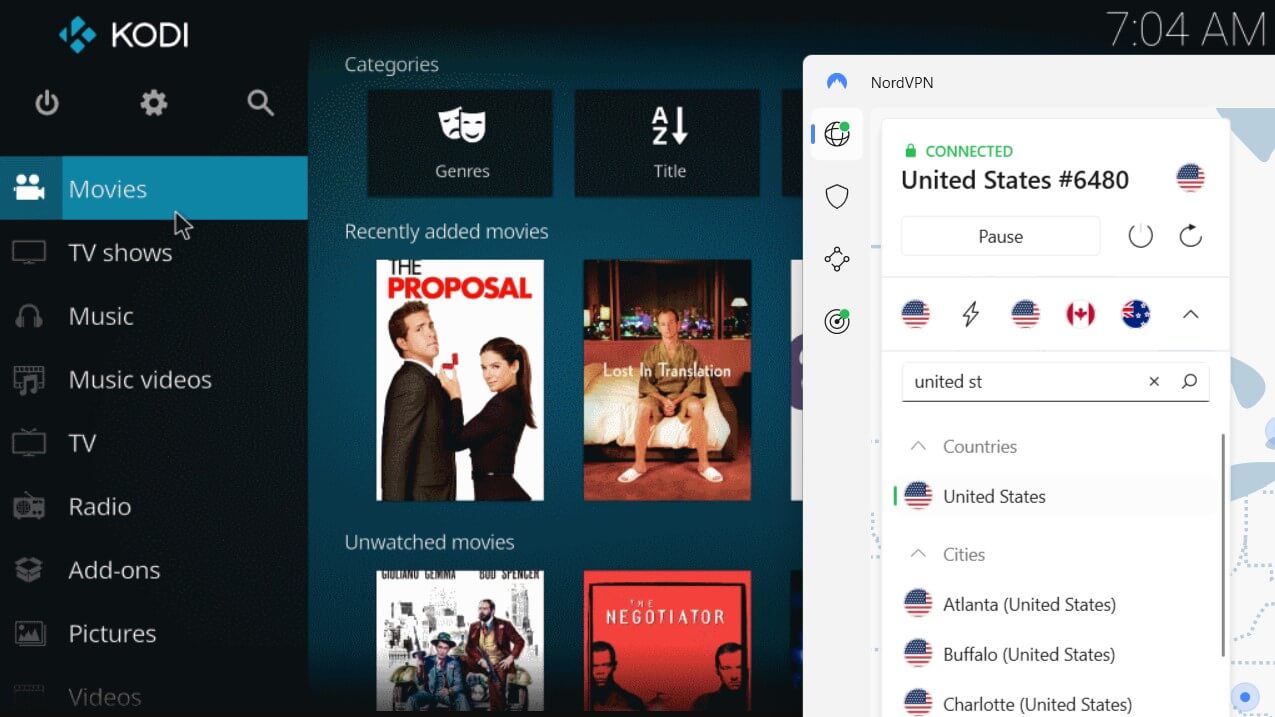
Open Kodi and enjoy streaming.
With NordVPN running in the background, you can now launch Kodi and access blocked services using the appropriate server location. Make sure you connect to NordVPN before launching Kodi. Otherwise, the change in IP might not be detected.
Alternatively, you can also configure NordVPN on your router. This way, you’ll never have to worry about enabling NordVPN every time you wish to use Kodi. Here’s a NordVPN router setup in New Zealand guide if you’re interested.
In case something goes wrong, you can check out my NordVPN not working in New Zealand guide. Hopefully, it should help you get rid of any issues.
But as a last resort, you can always cancel your NordVPN subscription in New Zealand and get a full refund.
Get NordVPN for Kodi in New Zealand 30 Days Money Back Guarantee
NordVPN on Kodi Method 2: How to Install NordVPN add-on Kodi in New Zealand
Installing a NordVPN Add-on Kodi in New Zealand is no rocket science. Just follow these steps and get it done in no time!
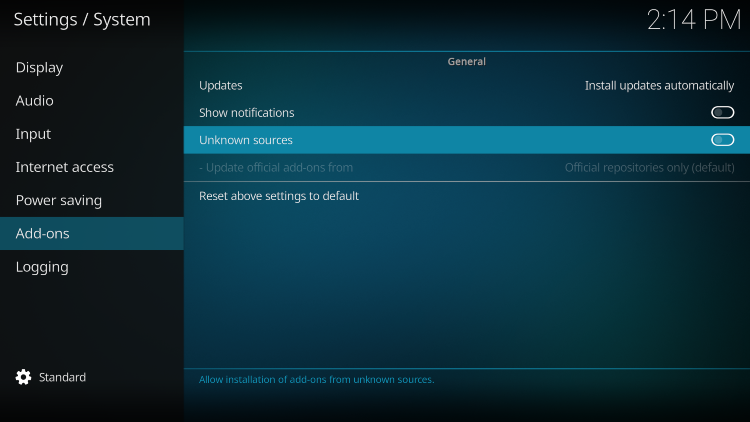
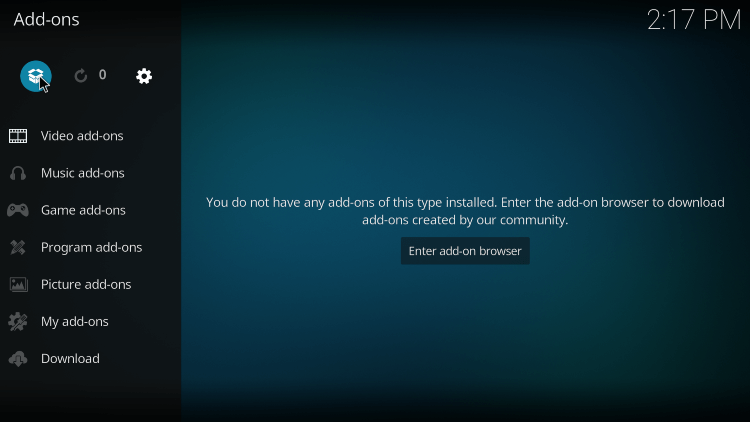
1. Select Add-ons under System Settings in Settings.
2. Accept the warning and toggle the Unknown Sources” option
3. Click Add-ons when you return to the main screen.

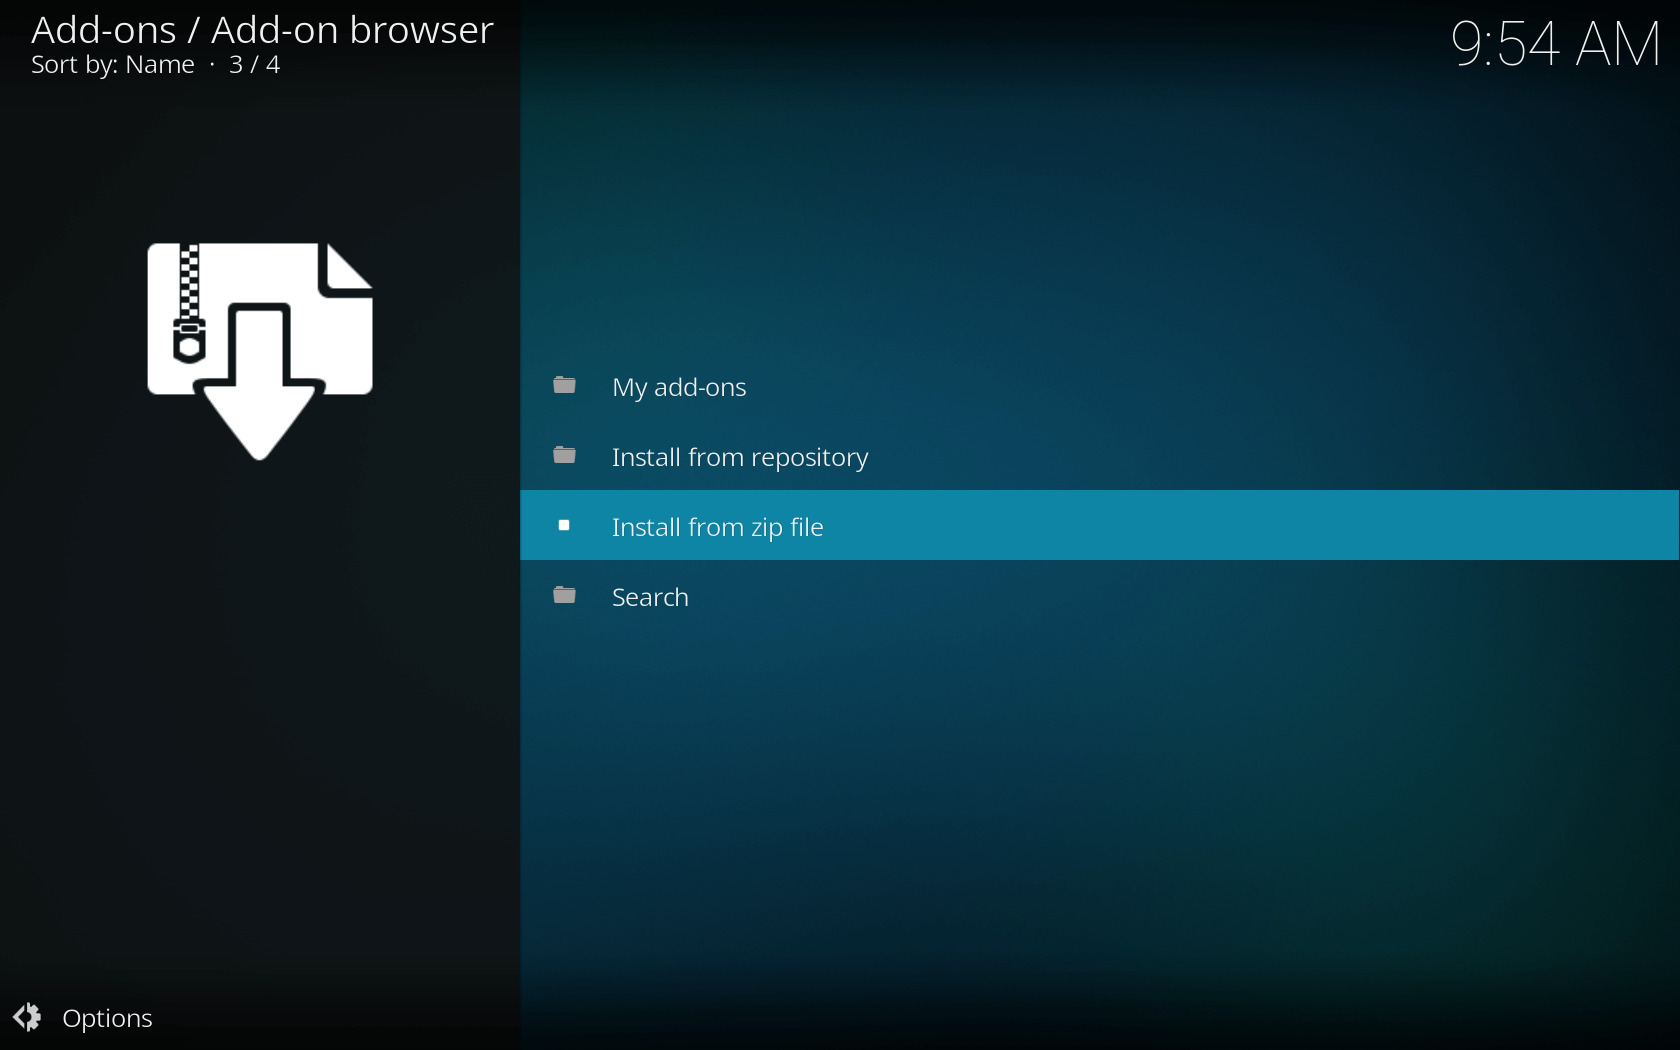
4. Select install from.zip file by clicking the package button in the upper left corner.
5. Choose the NordVPN on Kodi zip file that you may get from their website in step five.
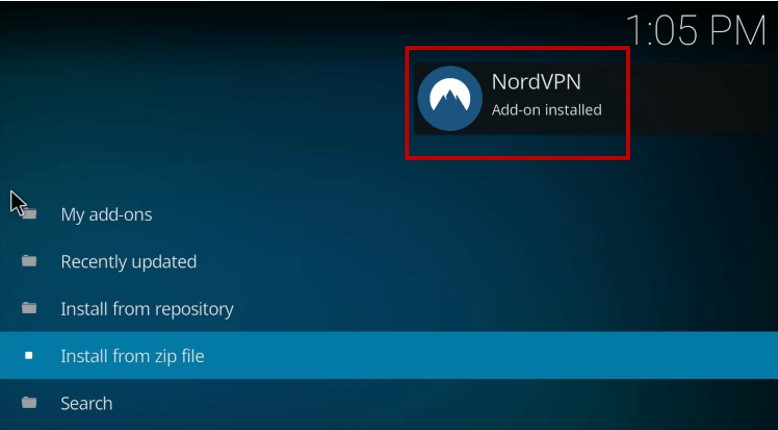
6. After the installation is finished, you will receive a notification indicating that it was successfully installed.
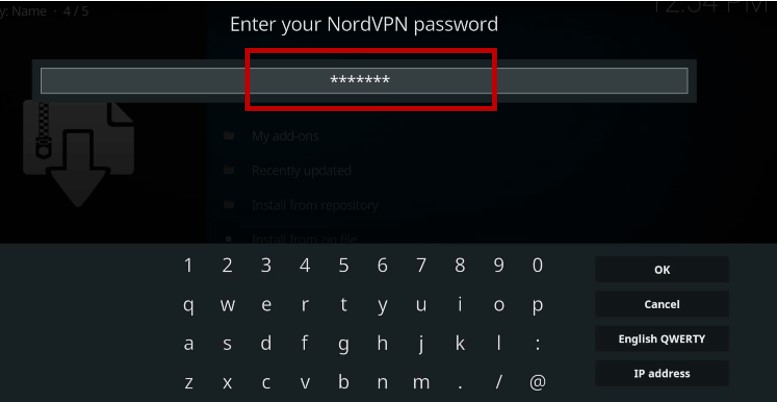
7. The setup wizard will walk you through entering your NordVPN login information.
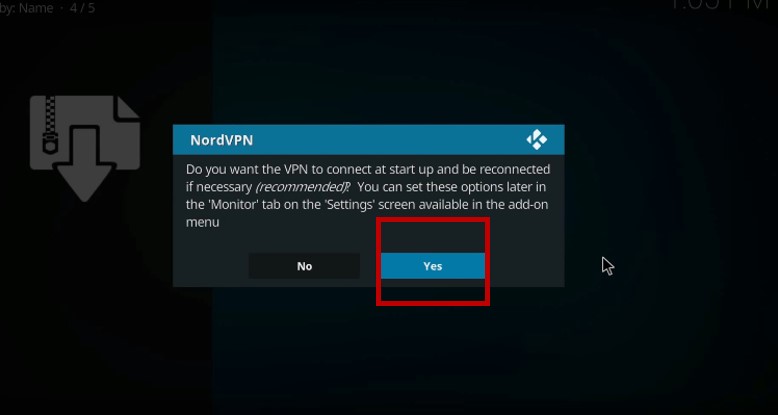
8. When asked if you want your VPN to connect automatically when you start up, select Yes”.
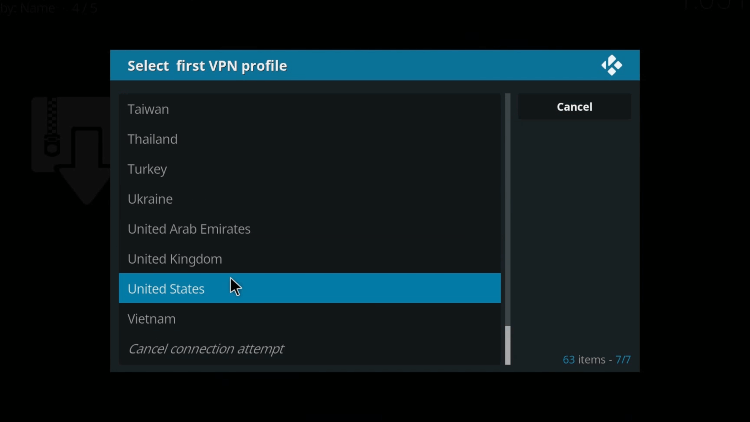
9. Select the country to which you want to connect.
10. You will be secured on Kodi as soon as the connection is made.
Get NordVPN for Kodi in New Zealand 30 Days Money Back Guarantee
How to Use NordVPN With Kodi in New Zealand?
Using NordVPN on Kodi zip file is even simpler than setting it up. You only need to enter your NordVPN login details and connect to a server. The step-by-step process for performing this task is provided below.
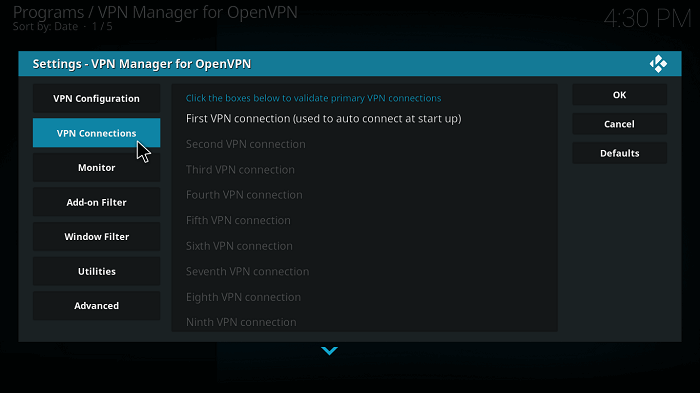
Step 1: Enter the VPN configuration by VPN Manager > Settings.
Step 2: Enter the username and password associated with your NordVPN subscribed account.
Step 3: Now click VPN Connections > First VPN connection.
Step 4: Wait for your login details to get validated and select your server when prompted.
Step 5: NordVPN will successfully establish a connection in a while.
That’s it. That’s how easy it is to use NordVPN with Kodi. If you own a Roku device as well, you might want to check out my NordVPN Roku setup guide in New Zealand as well.
How to Disconnect/Logout NordVPN on Kodi
Step 1: Open the main VPN manager screen
Step 2: Click “Change or disconnect VPN connection”
Step 3: Select Disconnect to end your VPN session and log out
How to Change Servers/Countries on NordVPN with Kodi?
Step 1: Visit the same VPN Manager main screen again and click “Change or disconnect VPN connection.”
Step 2: You will be prompted with a list of available server locations. Choose one and wait for the connection to re-establish.
How Can I use NordVPN on Raspberry Pi with Kodi in New Zealand?
Follow these steps to use NordVPN on Raspberry Pi in New Zealand with Kodi; if NordVPN is not working properly or facing some issues, then you can use other VPNs on Raspberry Pi in New Zealand with Kodi:
What makes a NordVPN on Kodi combination so appealing in New Zealand?
The world’s largest server and high level of encryption make a NordVPN on Kodi combination so appealing. With over 6000 servers, lightning-fast speeds, 256-bit AES encryption, unmatched IP leak prevention, and other cutting-edge features that make it simple to use, quick, and efficient, NordVPN is one of the best VPN services in the VPN industry.
But what makes it stand out from the competition is its special advantages for Kodi users. Whatever you stream with Kodi boxes will remain private thanks to full online anonymity and zero logging. You can freely add plug-ins and stream any movie or TV show you choose without violating copyright laws.
With a simple setup and a client that even new users can use, NordVPN’s software perfectly matches Kodi’s layout.
Apart from Kodi, you will never have any issues with other devices such as Linux, Pi devices, Samsung TV, Apple TV, and even LG TV – as it is configurable with NordVPN to let you watch geo-restricted content.
Stream Content Securely with NordVPN in New Zealand
For fast Kodi streaming performance, you need fast speed and security features. Luckily, NordVPN offers both. I mean, just check out NordVPN’s speed test results in New Zealand.
It is vital to ensure your security before you use Kodi. Although Kodi is a perfectly legal media streaming service, its open-source nature allows unofficial third-party developers to build add-ons to the app. These add-ons are unofficial, so any user caught using these can potentially land in legal trouble.
All of these worries can be easily eradicated through NordVPN, which uses sophisticated encryption technologies to keep your activities on Kodi hidden from your ISP and other agencies. So, even if you stream content on Kodi through torrents, you should have nothing to worry about.
Seriously, you don’t want to miss that.
NordVPN also allows you to add your Kodi add-ons on Linux and Raspberry Pi so that you can stream your favorite shows directly there. NordVPN is easily configurable with Linux in New Zealand and can also be set up on Raspberry Pi with NordVPN’s easy configuration.
There are numerous other perks of using NordVPN besides just streaming Kodi content. In fact, streaming Netflix with NordVPN is quite easy. This VPN, tailored for keen Stremio streaming aficionados, elevates your Stremio experience, establishing its place as the top choice for customers looking for the best VPN for Stremio in New Zealand.
Additionally, if you’re still skeptical, get a NordVPN free trial in New Zealand to test its services before purchasing it. For more information regarding NordVPN, just check out my detailed NordVPN review.
Get NordVPN for Kodi in New Zealand 30 Days Money Back Guarantee
Other Related Guides By VPNRanks
- Best Kodi Repositories in New Zealand: Access exclusive content and premium features with my handpicked Kodi repositories.
- Best Kodi add-ons in New Zealand: From movies to music, enhance your Kodi experience with the best add-ons.
- NordVPN with Chromecast in New Zealand
FAQs – NordVPN on Kodi in New Zealand
Does NordVPN work for Kodi in New Zealand?
Yes, NordVPN works perfectly fine with Kodi. Kodi library contains everything from TV shows to P2p downloading, which can put your identity at risk. So, NordVPN encrypts your connection and guards against your ISP, the network administrator, and any unwanted spies.
How do I use NordVPN on Kodi Fire Stick in New Zealand?
To use NordVPN on Kodi Firestick, first download and install the NordVPN program on your computer, then log in with your Username/Password. After that, start Kodi and connect to a US server from the server list. Any Kodi addon can now be used to access your preferred content.
Is it safe to use Kodi with NordVPN in New Zealand?
Yes, it is safe to use Kodi with NordVPN, as NordVPN secures your Kodi traffic, hides your IPs, and guards against your ISP and any unwanted snoops.
Using NordVPN, how do I tell if I am protected when using Kodi in New Zealand?
Go to the official site of NordVPN. Your status should be listed as Protected” in the bar at the top of the page if your connection is successful. Here, you may see what your IP address is. If the connection works, it should be different from the one your ISP gave you.
Can I use Kodi with NordVPN in New Zealand?
You can use Kodi with NordVPN using two methods: using the dedicated NordVPN app or by loading NordVPN’s .ovpn files as Kodi add-ons. Both methods are pretty straightforward to follow.
Final Words
NordVPN on Kodi is the perfect combo: one offers unlimited streaming for free, while the other guards your security and brings access to blocked streams in New Zealand with a single click.
Therefore, if you find yourself on the wrong side of the border and face geographical restrictions on Kodi’s channels, get yourself NordVPN and remove this obstacle instantly. I hope this blog on NordVPN Kodi helps you enjoy Kodi to the fullest! Share your feedback in the comments section below.
![Does Apple TV Work With ExpressVPN in New Zealand [Updated 2025]](https://www.vpnranks.com/wp-content/themes/generictheme/template/img/placeholder-main.png)