You can change Ubuntu IP address in Canada with a static IP address or through DHCP. Opting for a static IP allows manual configuration of your network settings on the Linux system, which is ideal for services requiring a consistent address. DHCP, alternatively, lets a router or DHCP server dynamically assign an IP, either reserved or from available addresses.
The best way to change the Ubuntu IP address, according to my research, is using a VPN like ExpressVPN. It secures your IP address changes and facilitates the configuration of DNS servers and default gateways in Canada. Its compatibility with Ubuntu and support for all necessary protocols make it an optimal choice for maintaining robust network settings.
The importance of VPNs extends beyond mere IP management. The best VPNs are essential for security and privacy, encrypting your connection and masking your IP address. For Ubuntu users, ExpressVPN offers an easy setup and a wide server network, ensuring control over network settings and safeguarding online activities.
Keep reading to learn how to change IP address Ubuntu in Canada, either a static IP address or through DHCP, with the help of a secure VPN like ExpressVPN.
Prerequisites for Configuring Network Settings on Ubuntu Server in Canada
To successfully configure network settings on your Ubuntu Linux Server in Canada, certain prerequisites and conventions must be adhered to. Below is a detailed table outlining the system requirements, necessary software, and usage conventions you need to be aware of:
| Category | Details |
|---|---|
| System | Ubuntu Linux Server |
| Software | Netplan |
| Other | Privileged access to your Linux system as root or via the sudo command. |
| Conventions | # – requires given Linux commands to be executed with root privileges either directly as a root user or by use of sudo command$ – requires given Linux commands to be executed as a regular non-privileged user |
How to Change IP Address in Ubuntu in Canada
When it comes to managing your Ubuntu server in Canada, changing the IP address is a common task that can be achieved through two primary methods. Each method suits different needs and setups, ensuring flexible network management.
How to Change Ubuntu IP Address via Static IP in Canada
For Ubuntu IP address change via Static IP in Canada follow the below steps:
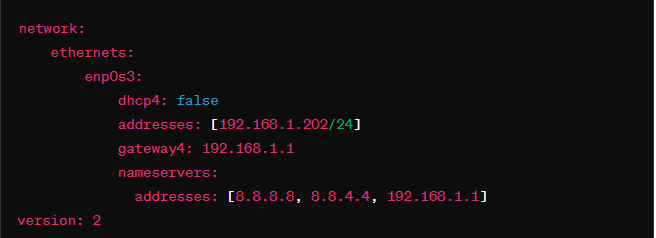
- Locate and Edit the Configuration File: Open the /etc/netplan/50-cloud-init.yaml file, or it may be named /etc/netplan/01-netcfg.yaml in some systems. Use a text editor with administrative privileges for this task.

- Update Network Settings: Insert your desired static IP address, DNS server, and gateway into the file.
- Apply the Changes: To activate the new settings, use the command: $ sudo netplan apply. If you encounter any issues, you can troubleshoot with: $ sudo netplan –debug apply.
- Confirm the IP Address: Verify the new static IP by executing: $ ip a.
How to Change Ubuntu IP Address via DHCP in Canada
If your server was previously set with a static IP and you wish to switch to DHCP in Canada, the process involves minor edits to the same configuration file:
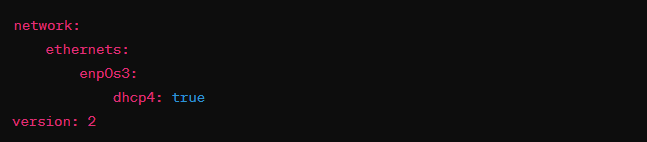
- Edit the Configuration File: Reopen /etc/netplan/50-cloud-init.yaml or /etc/netplan/01-netcfg.yaml. Change the dhcp4 setting under your network interface from false to true.
- Save and Apply the Changes: After saving the changes, apply them by running: $ sudo netplan apply. Use the debug option if needed.
- Verify the DHCP Configuration: Check that the DHCP setting is working by looking at the IP address assignment with: $ ip a.
Ubuntu Linux Change IP using Command Line Config File in Canada
By following these steps, you can easily perform an Ubuntu IP change through the GUI in Canada, which is often considered a user-friendly method:
Launch the terminal and write the following command:
sudo vi /etc/network/interfaces
Or
sudo gedit /etc/network/interfaces
Go to the eth0 section and set up the IP address as desired.
Now save and close the file and restart the network through this command:
$ sudo /etc/init.d/networking restart
To confirm the new IP address run this command:
$ ifconfig eth0
$ ifconfig
Note: To set a static IP address on Ubuntu using the command line, you can utilize the “ifconfig” command.
How to Statically Assign an Ubuntu IP Address in Canada
Whenever you are connected to a network, your device immediately gets an IP address from the network. There are two types of IP addresses in Canada; static and dynamic. Let’s find out how to assign a static IP address in Canada.
- First of all, launch Terminal.
- Next, run “ip addr show” command to see the network adapter for which you want to change the IP address, and then execute.
- Run “ip addr add X.X.X.X/24 dev eth0” command to modify the IP address (you can use any IP address you want to assign).
- Once executed, verify the new IP address by running “ip addr show”
How to Permanently Change the IP Address of an Ubuntu VM Using CLI
Changing the IP address of an Ubuntu virtual machine (VM) via the command line interface (CLI) ensures that you can manage your server remotely, even when hardware access is restricted. This guide will provide a detailed approach to permanently changing the IP address on Ubuntu versions 14 through 20, using CLI methods that remain consistent across these versions.
Method 1:
This command shows details about your existing connections, including connection types, DNS configurations, and interfaces.
1. Creating a Permanent IP Configuration with nmcli
The nmcli (Network Manager command-line interface) tool is standard on most Ubuntu installations and allows you to manage networking settings effectively. Here’s how to use nmcli to change your IP address permanently:
- Check Existing Network Settings: Begin by reviewing the current settings to avoid conflicts and to ensure correct information is used in your new configuration.
nmcli
2. Create a New Connection: Decide on the properties for your new network connection. Here’s an example command to create a new connection with a static IP:
sudo nmcli connection add connection.id “YOUR_CONNECTION_NAME” \ connection.interface-name “enp0s31f6” \ type ethernet \ ip4 172.18.1.30/24 gw4 172.18.1.1 \ ipv4.dns “8.8.8.8” \ ipv4.method manual
Replace "YOUR_CONNECTION_NAME" with a name of your choice, adjust "enp0s31f6" to your network interface name, and set the ip4, gw4 (gateway), and ipv4.dns fields as per your network requirements.
3. Activate the Connection:
Activate your newly created connection to start using it immediately:
sudo nmcli connection up YOUR_CONNECTION_NAME
4. Verify the Changes:
Check if the settings are applied correctly:
nmcli
5. Restart the Networking Service:
To ensure all configurations are loaded and will persist after a reboot, restart the networking service:
sudo systemctl restart networking.service
Method 2:
Ubuntu 17.10 and later versions typically use Netplan for network configuration, which is a YAML-based configuration system that makes setting up network interfaces straightforward. This method is especially useful if you’re running Ubuntu 18.04 or newer.
Step 1: Identify Your Configuration File
Netplan’s configuration files are typically located in /etc/netplan/. You’ll find one or more YAML files there. To view the content and identify the correct file to edit, use:
ls /etc/netplan/
cat /etc/netplan/your-config-file.yaml
Replace your-config-file.yaml with the actual file name.
2. Edit the Configuration File
- Open the Configuration File: Using a text editor such as
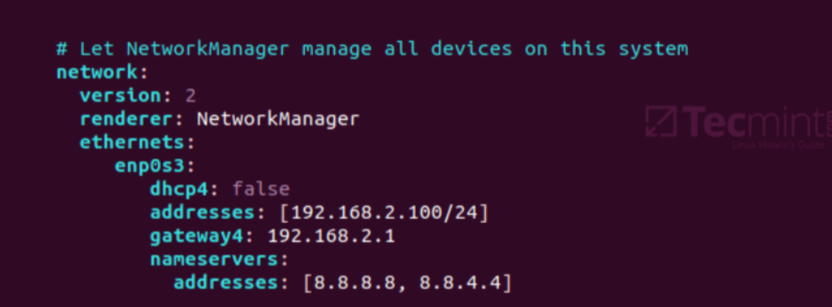
nano, open the configuration file. sudo nano /etc/netplan/your-config-file.yaml - Modify or Add IP Settings: Here’s an example of what the network configuration might look like for setting a static IP: network: version: 2 ethernets: your_interface_name: dhcp4: no addresses: – 172.18.1.30/24 gateway4: 172.18.1.1 nameservers: addresses: – 8.8.8.8 “Replace
your_interface_namewith your actual interface name. Adjust the IP address, gateway, and DNS as needed.” - Apply Changes: After editing the file, apply the changes with: sudo netplan apply.
Other VPNRanks Guide in Canada
- ExpressVPN on Linux in Canada: Unleash the Power of Privacy on Linux with ExpressVPN in the USA!
- ExpressVPN on Windows in Canada: Secure Your Windows Experience in the USA with ExpressVPN Installation!
- ExpressVPN on Android TV in Canada: Stream Safely on Android TV with ExpressVPN in the USA!
FAQs – Ubuntu IP Address in Canada
How do I change my IP address in the Linux terminal in Canada?
Run the “ifconfig” command accompanied by the network interface name and the new IP address you wish to change on your system. For the subnet mask, you can add a “netmask” clause along with the subnet mask or utilize the CIDR code straightaway.
How to change IP address in Ubuntu Terminal in Canada?
To change the IP address in Ubuntu Terminal, follow these steps:
- Launch Terminal.
- Use the “ip addr show” command to identify the network adapter you wish to modify the IP address for.
- Execute the “ip addr add X.X.X.X/24 dev eth0” command to change the IP address (replace X.X.X.X with the desired IP address).
How to change the IP address in Linux in Canada?
To change the IP address in Linux, follow these steps:
- Log in as a root user.
- Open a terminal session.
- Enter “ifconfig -a” in the command prompt.
- Use “ifconfig ethx xxx.xxx.xxx.xxx netmask xxx.xxx.xxx.xxx” with the values from step 3 for IP address and subnet mask, replacing “ethx” with the interface displayed in step 3.
- Press Enter.
How to configure IP address in Ubuntu 20.04 command line in Canada?
To change your IP address in Ubuntu 20.04, follow these steps:
- Edit the file “/etc/netplan/50-cloud-init.yaml” (or “/etc/netplan/01-netcfg.yaml”) with administrative privileges.
- Apply the modified Netplan configuration by running the command: “sudo netplan apply.”
- Verify the new static IP address using the command: “ip a.”
Note: For Ubuntu set static IP or to perform Ubuntu 22.04 network configuration from the command line, use the following one-liner: “sudo nano /etc/netplan/50-cloud-init.yaml && sudo netplan apply && ip addr”.
How do I change my IP address in Ubuntu 18.04 CLI in Canada?
To change your IP address in Ubuntu 18.04 CLI follow the steps:
- Open the GNOME Network configuration settings by searching for “network” in the Activities screen and clicking on the Network icon. Then, click on the cog icon.
- In the Network interface settings dialog box, go to the “IPV4” Method section and choose “Manual.” Enter your static IP address, Netmask, and Gateway. Click on the “Apply” button to save the changes.
- Open the terminal using the Ctrl+Alt+T keyboard shortcut or by clicking on the terminal icon. Type “ip addr” in the terminal.
- The output will display the interface IP address, such as “2: wlp1s0: <BROADCAST,MULTICAST,UP,LOWER_UP> mtu 1500 qdisc fq_codel state UP group default qlen 1000 link/ether 52:54:00:e9:40:f2 brd ff:ff:ff:ff:ff:ff inet 192.168.121.106/24 brd 192.168.121.255 scope global dynamic noprefixroute ens3 valid_lft 3523sec preferred_lft 3523sec inet6 fe80::5054:ff:fee9:40f2/64 scope link valid_lft forever preferred_lft forever.”
How do I set a static IP in the Ubuntu terminal in Canada?
Here is how to set up a static IP address using the command line in Ubuntu:
- Get the network interface and default gateway’s name.
- Locate the Netplan configuration.
- Edit the Netplan configuration to set up a static IP address.
Final Thoughts
Changing the IP address by using the best VPN for Ubuntu in Canada is a straightforward process, allowing users to configure their network settings according to their needs. Users can modify the IP address to meet specific requirements by following a few simple steps.
To change Ubuntu IP address in Canada, users can access the Network configuration settings, select the manual method under the IPV4 section, and enter the desired static IP address, netmask, and gateway. Verifying the changes can be done by using the “ip addr” command in the terminal, which displays the updated interface IP address.
For users seeking additional privacy and security while changing their IP address on Ubuntu, ExpressVPN stands out as the top recommendation. ExpressVPN not only easily changes Ubuntu IP addresses but also offers robust encryption, a vast server network, and user-friendly applications compatible with Ubuntu.