QNAP is a network-attached storage (NAS) device. Naturally, you should take invest in keeping your data assets safe and secure from the threat of cybercriminals, hackers, and the like.
But even more importantly, there are security vulnerabilities in QNAP and I’ve had the misfortune to encounter these.
I download a lot of 4k videos and high-resolution videos almost every day, so I purchased a QNAP TS-351 for my digital storage requirements. It is a pretty good device and I was completely satisfied with it.
But my joy didn’t last long. Just a few days into my purchase, I couldn’t log into the device at all. So I looked up the internet to find answers for whatever the hell was going on.
After a bit of Googling around, I found that there were multiple vulnerabilities within the QNAP endpoint API.
From that day, I have installed front-line software to add protective layers to my data security such as anti-viruses and VPNs.
In this article, I will solely focus on top VPNs and their importance for QNAP devices.
What is QNAP and what is it used for?
Before we delve down into QNAP VPN service setup steps, I think I should give you guys a brief overview of QNAP.
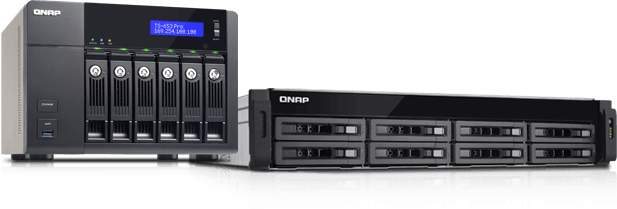
QNAP is a Taiwanese company offering Network Attached Storage (NAS) solutions. They offer powerful devices for both home and enterprise use.
Their devices are generally comprised of one or more hard drives and are connected 24/7 to the internet.
Since these devices are always connected to the internet, QNAP devices work as a backup hub.
Think of it as an external hard drive that’s accessible everywhere and you don’t even need to carry it around with you.
The result is a ubiquitous solution powered by QTS NAS OS that can remotely store all your valuable files such as photos, videos, music, and everything in between.
To further explain what QNAP’s capable of, ill list some of its use cases below.
- Back up your most valuable and cherishable digital files.
- Seamlessly share files and collaborate with one quick access link.
- Effortlessly expand your storage space.
- Access and store files in one centralized storage location.
- Remotely and securely access all your files anywhere from the world.
Step-by-step Method to Setup VPN on QNAP
Although, setting up a QNAP VPN client seems a bit complicated at first, but I’ve created a step-by-step installation process below that will help you to install VPN QNAP in a matter of seconds.
However, before we begin with the QNAP VPN tutorial, you need to download the following files.
Note: For our QNAP VPN setup, we have selected PureVPN, however, we would suggest getting ExpressVPN as it is much secure in terms of performance.
Here is how to setup VPN on QNAP NAS:
1- Access Control Panel>Applications and tap on VPN Client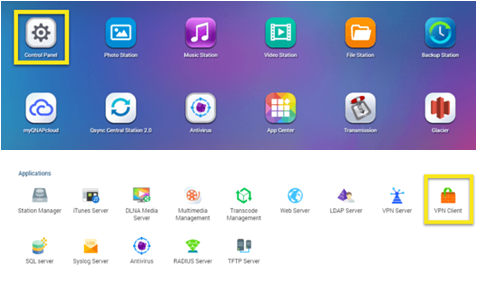
2- In VPN Client, tap on Add button and choose OpenVPN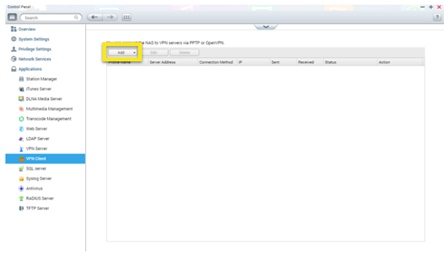
3- Next, you will be presented with a VPN connection window, where you have to enter the following details:
Profile Name: PureVPN
Server Address: Enter the server address of the desired location. You can find it in QNAP OpenVPN files
Server Port: UDP 53 (In case of TCP select Port 80)
Username: As provided by VPN provider
Password: As provided by the VPN provider
Encryption: High (AES 256 bit)
Certificate: Tap on browse and choose ca.crt from download configuration files
Check Boxes: Checkmark enable the options for “Use default gateway on remote network” and “Reconnect when the VPN connection is lost”
Afterward, click on Apply. The newly created VPN connection will appear in the list. However, we are not done yet, as you need to copy some files to NAS.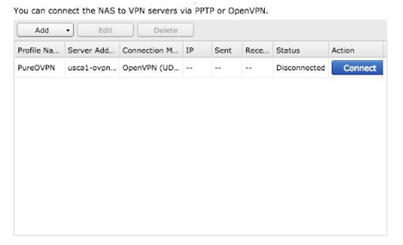
4- Navigate to Control Panel, choose Telnet/SSH and hit Apply. Make sure to checkmark enable “Allow SSH connection”, “Enable SFTP”, set Port number to “22” and proceed by clicking on Apply
5- Access WinSCP, choose protocol as SFTP, and enter the rest of the details as following:
Hostname: Set your QNAP NAS IP address
Port Number: 22
Username: admin
Password: enter the provided password
Click on Login and navigate to /etc/init.d
6- Next, you need to copy the file vpn_openvpn_client.sh to NAS “/etc/init.d” as shown in image below: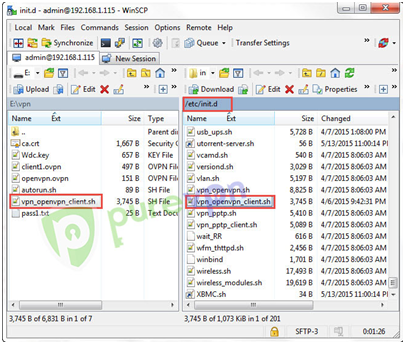
Note: You will need to copy this file every time NAS reboots. In addition, you will need to have ca.crt, Wdc.key, client1.ovpn, and pass1.txt files placed in the same directory as shown in the above screenshot.
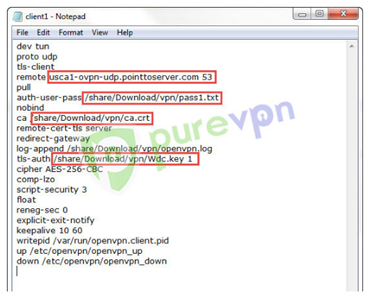
- Now, modify client1.ovpn and pass1.txt files by entering username, password, and server address as provided by PureVPN QNAP. Not to mention, you can find the server address in the OpenVPN files that you had downloaded earlier
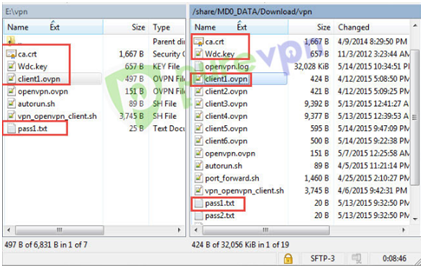
8- Next, you will have to create a folder in NAS to store files of clien1.ovpn, pass1.txt, ca.crt and Wdc.key. For this, we have created path /share/Download/vpn/
When done, you can drag and drop specified files to QNAP NAS folder through WinSCP or file manager, as shown below:
9- Finally, go to Applications>VPN Client, select PureOVPNprofile and tap on Connect
Upon successful connection, your network communication will become protected and secure against every odds of the cyber world.
Best VPN for QNAP
The task of selecting the best VPN for QNAP NAS in USA is simple but needs detailed research. It means you have to go through different attributes that make any VPN service ideal for QNAP network-attached storage devices.
You can consider these factors like strong encryption level, zero-logging policy, internet kill switch, DNS leak defense, and others. By doing so, you are able to safeguard your QNAP NAS with VPN through airtight protection.
Here is the list of VPN services that consists of:
| VPN Providers | Price ($) | Special Deals | More Info |
|---|---|---|---|
|
Overall Best VPN
ExpressVPN
|
$12.95
$6.67
Per Month |
Exclusive Offer
Save 49% today! |
|
|
Fastest VPN Service

Surfshark
|
$12.95
$2.49
Per Month |
82% Off
2 Year Plan |
|
|
Best for Geo-Unblocking

NordVPN
|
$11.95
$3.99
Per Month |
69% Off
2 Year Plan |
|
|
Feature-rich VPN

PureVPN
|
$10.95
$3.29
Per Month |
81% Off
Exclusive 2 Year Offer |
|
|
Best for Private Browsing

CyberGhost
|
$12.99
$2.03
Per Month |
83% Off
3 Years + 4 Months Free |
1. ExpressVPN- An Offshore VPN for QNAP Users
ExpressVPN is a VPN service currently offering its services through 3000+ servers worldwide. The brand has an existence in 94 countries of the world, therefore; you can connect to any server of your choice straightaway. Moreover, you can experience the QNAP ExpressVPN compatibility feature on different devices to another level.
Pros of ExpressVPN
- Offers 30 days money back guarantee to users
- Provides 256-bit military-grade encryption advantage
- Has efficient customer support for existing and new subscribers
Cons of ExpressVPN
- Offers expensive pricing plans to users
To read more about ExpressVPN, check out our comprehensive ExpressVPN review here.
2. Surfshark- An ultra-cheap VPN for QNAP Users

Surfshark is a super-powerful yet super affordable VPN service. It operates from the Virgin Islands and offers ultra-secure QNAP apps. Aside from being compatible with QNAP, Surfshark offers powerful and encryption and tons of anonymity to features that keep your most cherished personal data safe and secure.
Pros of Surfshark VPN
- 3200+ servers in 60+countries
- User-friendly interface
- Super secure
- 24/7 customer support
Cons of Surfshark VPN
- Few servers
3. NordVPN- Free Trial VPN for QNAP Users

NordVPN is providing 5000+ servers in 60+ countries globally. In addition, the Panama based service offers user-friendly apps that you can install on your QNAP NAS devices instantly. Likewise, you can attain a comprehensive list of features that allow you to spoof your online locations from anywhere.
Pros of NordVPN
- 5500+ servers in 60+ countries
- 30 days money back guarantee
- Provides 24/7 365 days live chat support feature
Cons of NordVPN
- Does not offer services in the Philippines
You may also like: NordVPN vs ExpressVPN Analogy 2022
4. PureVPN – Seamless QNAP VPN for Users

PureVPN is compatible with QNAP’s NAS devices to another level. Through 6500+ servers, you can secure your online privacy on QNAP NAS devices hassle-free. Moreover, you can avail of its generous 31 days money back guarantee to experience the performance of the brand on your desired operating systems.
Pros of PureVPN
- Offers 6500+ servers in 141+ countries
- Provides an eye-catching 31 days money back guarantee
- Has an efficient 256-bit military-grade encryption
Cons of PureVPN
- Offers a paid trial benefit to users
5. CyberGhost- Multitasking VPN for QNAP Users

CyberGhost is a super affordable VPN that just happens to be compatible with QNAP. It offers over 6000 servers in 60 countries across the world. CyberGhost is extremely secure as well offering powerful encryption, kill switch, split tunneling, and tons of other features specially geared towards privacy.
Pros of CyberGhost
- 6,000+ servers in 90 countries
- Affordable plans
- No logs
- Strong encryption standards
Cons of CyberGHost
- Few negative reviews online
QNAP VPN Server
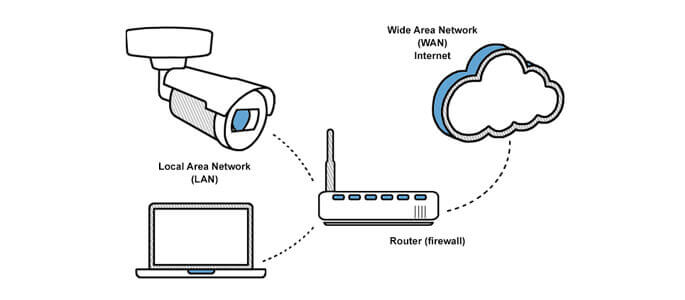
VPN allows you to access network resources and services across a public network through secure connections. Likewise, QNAP NAS offers a VPN service that enables users to use their resources on their NAS devices through different tunneling protocols.
These varied protocols are layer2 tunneling protocol (L2TP) over IPsec (L2TP/IPsec), point-to-point tunneling protocol (PPTP), and OpenVPN protocol too. This way, QNAP NAS users can obtain next-level security and anonymity instantly.
Here is the list of steps you can follow to achieve your mission:
- Preparation
- Enable L2TP/IPsec, PPTP or OpenVPN
- Add a new VPN user
- Activate auto route configuration function
Preparation
- You need to have a proper internet connection
- L2TP/IPsec supported QTS version 4.2.0 or above is needed
- The VPN server, VPN client, and L2TP/IPsec VPN services are embedded in one app “QVPN Service” that you can download to your NAS in App center
L2TP/IPsec
There is no denying L2TP (Layer Two Tunneling Protocol) is a combination of Point-to-Point Tunneling Protocol (PPTP) and L2F (Layer 2 Forwarding). The said protocol endorses the application of different protocols.
The combination of L2TP and IPsec offers next-level online protection and anonymity. Moreover, it is compatible with different operating systems. Here is how you can enable L2TP/IPsec protocol:
- From the app center, you can search for L2TP/IPsec and add it to your NAS
- Once you have performed the installation task, you should go to the control panel
- Through control panel>applications>VPN server>VPN server settings
- Enable L2TP/PPTP VPN server, choose L2TP/IPsec and go to configuration settings
- Through the VPN client IP pool, you should enter the start and end IP addresses
- You should also enter the pre-shared key, the maximum number of clients, authentication, and select a network interface
- You should specify DNS server manually and also mention DNS server IP for VPN clients
PPTP
To activate PPTP (Point-to-Point Tunneling Protocol), you should follow the below-mentioned steps:
- From control panel>applications>VPN server> VPN server settings>enable L2TP/PPTP VPN server and choose “PPTP” and go to configuration settings
- Through the VPN client IP pool, you should enter the start and end IP addresses
- You should also select the maximum number of clients, authentication, and select a network interface
- You should specify DNS server manually and also mention DNS server IP for VPN clients
OpenVPN
You can enable OpenVPN by performing the following steps:
- From control panel>applications>VPN server> VPN server settings>enable L2TP/PPTP VPN server, activate OpenVPN server, and go to configuration settings
- Through the VPN client IP pool, you should enter the start and end IP addresses
- Choose OpenVPN transport protocol by opting UDP or TCP
- You should also select the maximum number of clients, authentication, and select a network interface along with encryption method
- You should also select a redirect-gateway option and enable the compressed VPN link option too
- You should specify DNS server manually and also mention DNS server IP for VPN clients
Add a New VPN Server
Here is how you can add a new VPN server after following the provided steps:
- From control panel>applications>VPN service> VPN client management>Add VPN users and select the connection type accordingly
Setup port forwarding on your router
You can set up the PPTP port forward on your router by following the below-mentioned steps:
- You should open the NAT router if your QNAP NAS is situated behind the NAT router
- Forward these QNAP VPN ports to fixed LAN IP of NAS, the function is called on different routers
- You can also use your WAN IP to connect to your QNAP NAS
This is how you can set up a QNAP NAS VPN server quite easily. Unlock the full potential of your QNAP NAS by effortlessly configuring a VPN server. Dive into our guide for a seamless setup. Explore our top recommendation for the best VPN with port forwarding because superior port forwarding capabilities are crucial for maximizing your NAS experience.
Why would you even need a VPN for QNAP?

Now you might be wondering why on earth would you even need a VPN for QNAP, and that perfectly understandable.
Technically speaking you don’t need to setup QNAP VPN. You don’t also need to back up your data every now and then but you do it anyway, why…?
Just as you wouldn’t want to lose your precious data, you wouldn’t want hackers to get a hold of your valuable digital files.
This is where a VPN QNAP comes in.
Fortunately, most NAS devices nowadays support VPN integration and QNAP’s NAS devices are no exception.
In fact, with QNAP you can even set up more than one popular VPN client at a time for ultimate security.
FAQs
What file system does QNAP use?
QNAP (Network-Attached Storage) devices use the EXT3 along with journaling file system. This type of file system is typically used in serves. This file system offers way better file location and fragmentation methods as compared to NTFS or FAT.
How do I reset my QNAP?
Resetting a QNAP device is pretty straightforward. All you need to do is, press and hold the reset button for around 10 sec until you hear two distinct beeps. That’s it, your QNAP device will now reset itself to factory settings.
How do I reset my QNAP password?
Resetting the password of your QNAP device to default is fairly simple. All you need to do is hold the reset button for around 3 seconds or until you hear a single beep. That’s it, your password is now set to admin which is the default password for QNAP NAS devices.
QNAP VPN not working.
Just like most VPNs, sometimes you are going to encounter few hiccups. The best way to overcome any VPN related issue is to contact support ASAP.
Wrapping up!
Without a doubt, QNAP is a symbol of quality network products and digital services. However, various incidents have already proven that no hardware including QNAP NAS is safe against global surveillance, five eyes, NSA equation group, and even hackers.
With that being said, you yourself are responsible for safeguarding your privacy. Use one of the best QNAP VPN mentioned in this blog to store, share and access files globally without worrying about a thing.
And make sure you follow the QNAP VPN client setup exactly as shown above in this guide to avoid any problems.